
AWS Cloudfront
CloudFront is Amazon’s global content delivery network with massive capacity and scale. It is optimized for performance and scalability. Security features are also built in and you can configure them for optimal service. The user is in control of the service and can make changes on the fly. It includes real time reporting so that you can monitor the performance and make changes to the application or the way the CDN interfaces with your application. It has been optimized for static and dynamic objects and video delivery. To get a more basic understanding of how CloudFront functions you can click this link here.
Let’s take a look at some of the components of CloudFront.
Distributions
Distributions is the instantiation of CloudFront. It acts as a pointer to the original content that you are hosting either in an AWS or custom origin. The origins need to be specified in the distribution so that CloudFront knows where to get the content when a request comes in and we don’t have the content stored in the cache.
Origins
Origins describes the Amazon S3 bucket or HTTP server or could be a EC2 instance from which CloudFront gets the content. At least one origin should be created. To maintain security and make sure that your origin is delivering content to CloudFront there are a couple of things that you can do. You can use a OAI (Origin Access Identity) for S3 so that it will restrict access for S3 bucket to just CloudFront. Any other request not coming from CloudFront will be denied. You can use a Signed URL, such that CloudFront can use that to access the origin and origin will respond only if the content of the signed URL is valid. You can also use an Origin Custom Header that goes back from CloudFront to your origin and based on the value of the header the origin will search for the header and if it does not exist or the value is incorrect the request will be denied.
Behaviors
Behaviors is where you are able to do all the configurations. It allows you to enforce policies, change or vary the type of content being delivered depending on who’s requesting it or how long an object will stay in cache. CloudFront Distributions have one to many Behaviors, there’s always one default Behavior. You can have different Behavior in order of precedence and if in that order of precedence no condition is met, then the default Behavior will take place.
Restrictions, Errors and Tags
CloudFront allows you to restrict access based on geographical location of the requester at no additional costs. You can either white list or black list a location. This could be due to security reasons or due to the fact that you only have the rights to distribute content to a few regions. Errors allow you to return an error page when there is an error. You can cache the error page for a certain amount of time and also set the response code that should be sent.
AWS WAF (Web Application Firewall)
AWS WAF helps protect your web applications from common exploits that could affect your web application availability, security, or consume resources. It can define customisable security rules that determine which traffic to allow and deny . It is a 7 Layer Application Protection that is built into each of the CloudFront edge locations worldwide.
CloudFront Regional Edge Caches are regional caches deployed around the world and it acts as a caching tier between the edge location and the origin. Earlier, when there were no Regional Edge Caches, the CDN edge locations had to go back to the origin when they had no content in them. With Regional Edge Caches, the edge locations would go to the origins only if the Regional Edge Caches did not have the content in them. Regional Edge Caches lies between the CDN edge locations and the origins and helps reduce the load on the origin, allows you to scale the CDN without having to scale the origin and does not incur any additional costs. Regional Edge Caches have larger caches than edge location so objects will remain longer in them.
To configure CloudFront first you have to create a CloudFront distribution so that CloudFront knows where to deliver the content from. You specify origin servers ( S3 buckets or HTTP servers ) to store your objects (files). You upload the files which can be web pages, images and media files to your origin servers. Then you create the distributions so that CloudFront knows which origin servers to get the files from. You can also specify whether you want to log all requests and whether you want to enable the distribution as soon as it is created. CloudFront assigns a domain name to your distribution which you can see in the console. CloudFront will send the configuration of the distribution to all of its edge locations.Configuring CloudFront (Source: https://docs.aws.amazon.com/AmazonCloudFront/latest/DeveloperGuide/HowCloudFrontWorks.html)

When a user requests objects on your website or application, the DNS routes the request to the nearest CloudFront edge location, which can best serve the user’s request in terms of latency. In the edge location, CloudFront will check the cache to see if the content being requested is there in the cache and returns it to the user. If the content is not there in the cache, then CloudFront will forward the request to the applicable origin server. The origin server will send the corresponding file to the CloudFront edge location which will be forwarded by CloudFront to the user and also stored in the cache in case someone else tries to request that file. Content delivery using CloudFront (Source: https://docs.aws.amazon.com/AmazonCloudFront/latest/DeveloperGuide/HowCloudFrontWorks.html)

CloudFront ensures that data is distributed globally with the highest performance possible. We can protect our content by using CloudFront’s private feature to regulate who can access our content. CloudFront is one of the most easiest and highly available content delivery networks in the market.
How to set up AWS CloudFront?
Sign in to your AWS management console and then go to CloudFront service, which should give you a window just like below the below screenshot.
CloudFront starting dashboard

2. Meanwhile, get your Amazon S3 up and running. Also, create a folder in S3 and upload a file. I will be uploading an image file in this case.

I am currently working from Mumbai region and so created an S3 bucket named cloud-front-bucket-january-canada in Canada region for this illustration. Permissions for the file need to be set in a way so that it’s accessible for the public for now.
3. Now let’s configure the distribution on CloudFront console. After clicking on ‘Create Distribution’ given in step 1, we get this below shown console with 2 options.

As explained in the page itself, Web is used for static and dynamic content whereas RTMP is used for streaming media files. So here we need to select Web as it’s a simple static content that we are working on.

4. Once we click on Get Started under Web, we get a long list of options to choose from. Let’s discuss those options one at a time. As shown above, we get the Origin Settings first; in Origin Domain Name, we need to select the source which is our S3 bucket here. Next option is Origin Path, where we need to give the path of the folder in which we have the image file. If the file(s) is not in a folder and directly uploaded to S3, we should leave this blank.Origin Settings in creating CloudFront Distribution
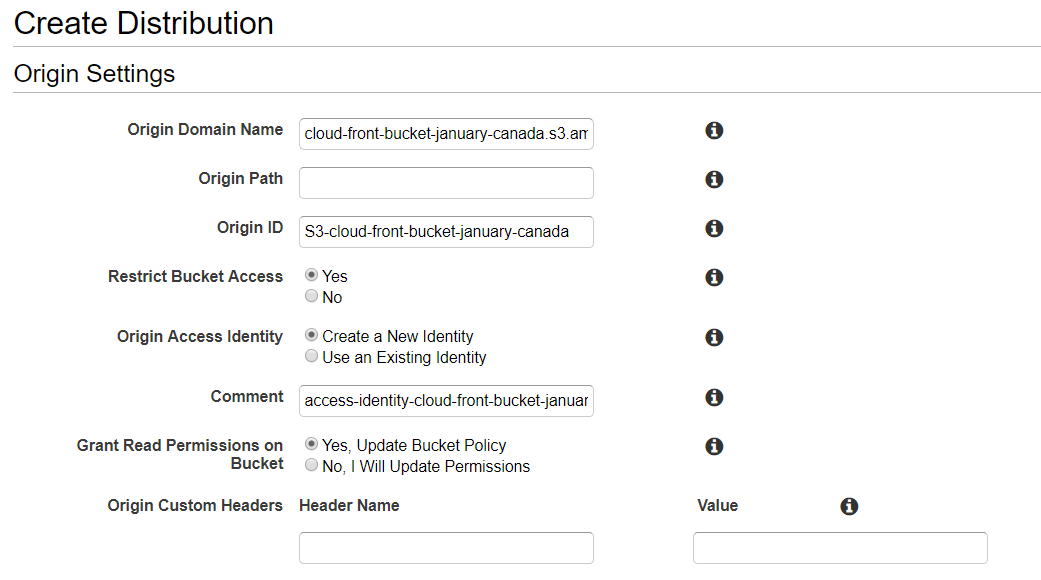
Having filled Origin Domain Name, Origin ID(it’s automatically populated), we now click ‘yes’ on Restrict Bucket Access which will enable the customers to use only the CloudFront URL and disable the S3 URL for everyone. You can also read about all these options by clicking on the small ‘i’ right next to each box. Next, we click on ‘Create New Identity’ for Origin Access and then Grant Read Permissions on Bucket.
Let’s look at the next batch of options from the form.

Selecting “Redirect HTTP to HTTPS” helps anyone to view the content accessing the URL using either of the prefixes. If we select ‘HTTPS only’ option, which in fact is a secure option, anyone using HTTP as a prefix will face an error and will not be able to access the content. Rest of the options are kept in default values. The TTL(Time to Live) values represent the time for which the data exist in Edge Locations. The unit of the TTL is seconds.
We use the default values for the rest of the settings on this page.![]()


We can also give custom SSL certificate if we require our users to access the content using an alternate domain name, for example, https://www.example.com/logo.jpg. You can also import/request a certificate with ACM which is AWS Certificate Manager. Please read more about that here. Now, we can click on ‘Create Distribution’ which will create our CloudFront distribution.CloudFront Distribution initialisation page.

It’s normal to see a message just like above after we click on Create Distribution. It gives us the information on how to configure signed URLs for private content distribution(contents which customers pay to access). To see our newly created distribution, click on the option Distribution from the left panel.

AWS usually takes around 10–15 mins to provision a distribution, however, in the grand scheme of things it’s quite alright considering the level of architecture running behind. Once it’s done we can see the status changing to ‘Deployed’ just like the below screenshot.

Select the particular distribution and go to ‘Distribution Settings’ to view/change specific settings like geo restrictions, custom error messages, invalidation etc.
Next, go to AWS S3 and access the uploaded file using the URL mentioned there and notice the time taken for it to load. Remember, here we are accessing a file in Canada S3 bucket. Since we have already kept it open for public, we can access the file using this link and view it on our browser.
Let’s change the permission settings for this file and remove public read access. We are bound to receive the below error while accessing the file.Image accessed using S3 URL

Next, I will try and access the same file using CloudFront URL, which we get from the General tab of the particular Distribution. Please refer to the below screenshot.Settings tab of CloudFront Distribution

Copy the Domain Name and paste it in the address bar, followed by the file name. You will be able to access the file now and it’s happening through CloudFront distribution.Image accessed using distribution URL

You will notice a lag while loading the file for the first time because the edge location has just pulled the file from the origin for you. However, after the first time, that lag will be gone and you will be able to access the same file instantly on any other browser or even on a different device. The reason behind that is now the file is being accessed from the nearby edge location and not the origin, which is the S3 bucket in this case. We can also set up an EC2 instance as an origin for a distribution. CloudFront can also be used to upload files as well which is a story for another day.
Last updated