Create a Build Pipleine

Lets now Build Pipeline using Jenkins file (same gitlab yml file) or using Jenkins Pipeline Project
Jenkins Pipeline Concepts
What is a JenkinsFile?
Why Use Jenkins Pipeline?
Install Build Pipeline Plugin in Jenkins
How to Create Jenkins Pipeline
Running Jenkins pipeline
Best Practices using Jenkins Pipeline
What is a JenkinsFile?
Jenkins pipelines can be defined using a text file called JenkinsFile. You can implement pipeline as code using JenkinsFile, and this can be defined by using a domain specific language (DSL). With JenkinsFile, you can write the steps needed for running a Jenkins pipeline.
The benefits of using JenkinsFile are:
You can create pipelines automatically for all branches and execute pull requests with just one JenkinsFile.
You can review your code on the pipeline
You can audit your Jenkins pipeline
This is the singular source for your pipeline and can be modified by multiple users.
JenkinsFile can be defined by either Web UI or with a JenkinsFile.
Declarative versus Scripted pipeline syntax:
There are two types of syntax used for defining your JenkinsFile.
Declarative
Scripted
Declarative:
Declarative pipeline syntax offers an easy way to create pipelines. It contains a predefined hierarchy to create Jenkins pipelines. It gives you the ability to control all aspects of a pipeline execution in a simple, straight-forward manner.
Scripted:
Scripted Jenkins pipeline runs on the Jenkins master with the help of a lightweight executor. It uses very few resources to translate the pipeline into atomic commands. Both declarative and scripted syntax are different from each other and are defined totally differently.
Why Use Jenkin's Pipeline?
Jenkins is an open continuous integration server which has the ability to support the automation of software development processes. You can create multiple automation jobs with the help of use cases, and run them as a Jenkins pipeline.
Here are the reasons why you use should use Jenkins pipeline:
Jenkins pipeline is implemented as a code which allows multiple users to edit and execute the pipeline process.
Pipelines are robust. So if your server undergoes an unforeseen restart, the pipeline will be automatically resumed.
You can pause the pipeline process and make it wait to resume until there is an input from the user.
Jenkins Pipelines support big projects. You can run multiple jobs, and even use pipelines in a loop.
Jenkins Pipeline Concepts
Term
Description
Pipeline
The pipeline is a set of instructions given in the form of code for continuous delivery and consists of instructions needed for the entire build process. With pipeline, you can build, test, and deliver the application.
Node
The machine on which Jenkins runs is called a node. A node block is mainly used in scripted pipeline syntax.
Stage
A stage block contains a series of steps in a pipeline. That is, the build, test, and deploy processes all come together in a stage. Generally, a stage block is used to visualize the Jenkins pipeline process.
Step
A step is nothing but a single task that executes a specific process at a defined time. A pipeline involves a series of steps.
Install Build Pipeline Plugin in Jenkins
With the build pipeline plugin, you can create a pipeline view of incoming and outgoing jobs, and create triggers which require manual intervention.
Here is how you can install the build pipeline plugin in your Jenkins:
Step 1) The settings for the plugin can be found under Manage Jenkins > Manage Plugins.
If you have already installed the plugin, it is shown under the installed tab
Step 2) If you do not have the plugin previously installed, it shows up under the Available tab.
Once you have successfully installed the build pipeline plugin in your Jenkins, follow these steps to create your Jenkins pipeline:
Pipeline concepts
Pipeline
This is a user defined block which contains all the processes such as build, test, deploy, etc. It is a collection of all the stages in a Jenkinsfile. All the stages and steps are defined within this block. It is the key block for a declarative pipeline syntax.

Node
A node is a machine that executes an entire workflow. It is a key part of the scripted pipeline syntax
There are various mandatory sections which are common to both the declarative and scripted pipelines, such as stages, agent and steps that must be defined within the pipeline. These are explained below:
Agent
An agent is a directive that can run multiple builds with only one instance of Jenkins. This feature helps to distribute the workload to different agents and execute several projects within a single Jenkins instance. It instructs Jenkins to allocate an executor for the builds.
A single agent can be specified for an entire pipeline or specific agents can be allotted to execute each stage within a pipeline. Few of the parameters used with agents are:
Any
Runs the pipeline/ stage on any available agent.
None
This parameter is applied at the root of the pipeline and it indicates that there is no global agent for the entire pipeline and each stage must specify its own agent.
Label
Executes the pipeline/stage on the labelled agent.
Docker
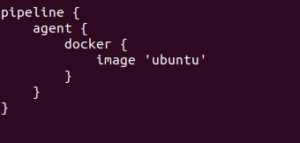
This parameter uses docker container as an execution environment for the pipeline or a specific stage. In the below example I’m using docker to pull an ubuntu image. This image can now be used as an execution environment to run multiple commands.

Stages
This block contains all the work that needs to be carried out. The work is specified in the form of stages. There can be more than one stage within this directive. Each stage performs a specific task. In the following example, I’ve created multiple stages, each performing a specific task.

Steps
A series of steps can be defined within a stage block. These steps are carried out in sequence to execute a stage. There must be at least one step within a steps directive. In the following example I’ve implemented an echo command within the build stage. This command is executed as a part of the ‘Build’ stage.

Now that you are familiar with the basic pipeline concepts let’s start of with the Jenkins pipeline tutorial. Firstly, let’s learn how to create a Jenkins pipeline.
Creating your first Jenkins pipeline.
Step 1: Log into Jenkins and select ‘New item’ from the dashboard.

Jenkins Dashboard – Jenkins Pipeline Tutorial
Step 2: Next, enter a name for your pipeline and select ‘pipeline’ project. Click on ‘ok’ to proceed.
Enter the project name – Jenkins Pipeline

Step 3: Scroll down to the pipeline and choose if you want a declarative pipeline or a scripted one.

Declarative or scripted pipeline – Jenkins Pipeline Tutorial
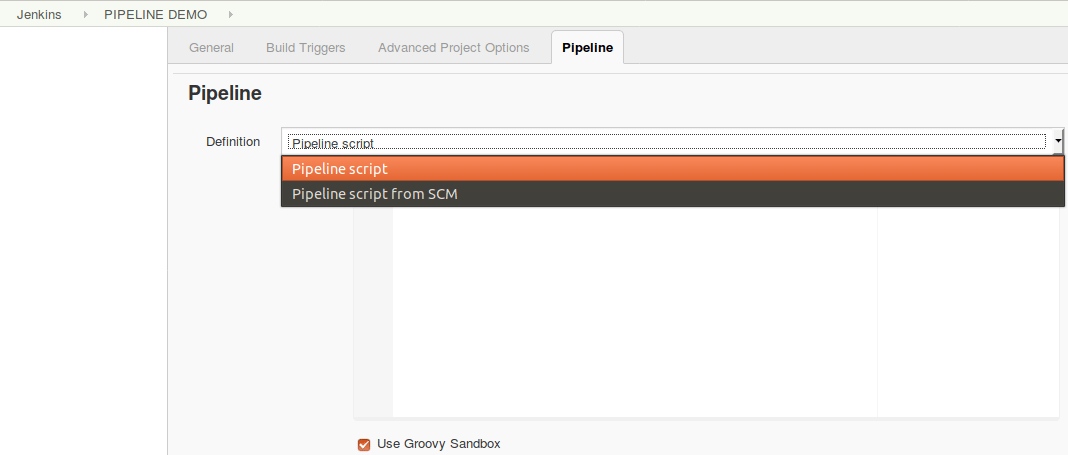
Step 4a: If you want a scripted pipeline then choose ‘pipeline script’ and start typing your code.

Scripted Pipeline – Jenkins Pipeline Tutorial
Step 4b: If you want a declarative pipeline then select ‘pipeline script from SCM’ and choose your SCM. In my case I’m going to use Git throughout this demo. Enter your repository URL.
Declarative pipeline – Jenkins Pipeline Tutorial

Step 5: Within the script path is the name of the Jenkinsfile that is going to be accessed from your SCM to run. Finally click on ‘apply’ and ‘save’. You have successfully created your first Jenkins pipeline.
Script path – Jenkins Pipeline Tutorial

Now that you know how to create a pipeline, lets get started with the demo.
Declarative Pipeline Demo
The first part of the demo shows the working of a declarative pipeline. Refer the above ‘Creating your first Jenkins pipeline’ to start. Let me start the demo by explaining the code I’ve written in my Jenkinsfile.
Since this is a declarative pipeline, I’m writing the code locally in a file named ‘Jenkinsfile’ and then pushing this file into my global git repository. While executing the ‘Declarative pipeline’ demo, this file will be accessed from my git repository. The following is a simple demonstration of building a pipeline to run multiple stages, each performing a specific task.
The declarative pipeline is defined by writing the code within a pipeline block. Within the block I’ve defined an agent with the tag ‘any’. This means that the pipeline is run on any available executor.
Next, I’ve created four stages, each performing a simple task.
Stage one executes a simple echo command which is specified within the ‘steps’ block.
Stage two executes an input directive. This directive allows to prompt a user input in a stage. It displays a message and waits for the user input. If the input is approved, then the stage will trigger further deployments.
In this demo a simple input message ‘Do you want to proceed?’ is displayed. On receiving the user input the pipeline either proceeds with the execution or aborts.

Stage three runs a ‘when’ directive with a ‘not’ tag. This directive allows you to execute a step depending on the conditions defined within the ‘when’ loop. If the conditions are met, the corresponding stage will be executed. It must be defined at a stage level.
In this demo, I’m using a ‘not’ tag. This tag executes a stage when the nested condition is false. Hence when the ‘branch is master’ holds false, the echo command in the following step is executed.

Stage four runs a parallel directive. This directive allows you to run nested stages in parallel. Here, I’m running two nested stages in parallel, namely, ‘Unit test’ and ‘Integration test’. Within the integration test stage, I’m defining a stage specific docker agent. This docker agent will execute the ‘Integration test’ stage.
Within the stage are two commands. The reuseNode is a Boolean and on returning true, the docker container would run on the agent specified at the top-level of the pipeline, in this case the agent specified at the top-level is ‘any’ which means that the container would be executed on any available node. By default this Boolean returns false.
There are some restrictions while using the parallel directive:
A stage can either have a parallel or steps block, but not both
Within a parallel directive you cannot nest another parallel directive
If a stage has a parallel directive then you cannot define ‘agent’ or ‘tool’ directives
Now that I’ve explained the code, lets run the pipeline. The following screenshot is the result of the pipeline. In the below image, the pipeline waits for the user input and on clicking ‘proceed’, the execution resumes.Waiting for user input – Jenkins Pipeline Tutorial

Final output – Jenkins Pipeline Tutorial

Here is the example of pipeline script to run node js build
Last updated
