# Install Gitlab on EC2
GitLab is **free**, at least its community edition. **But** **hosting it is not,** unless you are open sourcing and plan to use it directly in [GitLab’s website](https://about.gitlab.com/pricing/). We’ll be using GitLab CE (Community Edition).
*Note, you can opt to manually install GitLab instead of configuring through AWS. If so, follow* [*these steps from GitLab’s website*](https://about.gitlab.com/installation/#ubuntu)*. If you’re doing this, skip to #2.*
I’m going to assume that you already have created an AWS account. The first thing you want to do, is to head to [Amazon’s Marketplace, and get the GitLab Community Edition](https://aws.amazon.com/marketplace/pp/B071RFCJZK).

You’re going to hit “Continue to Subscribe”
Couple of things to notice:
1. The version of GitLab that it’s going to install, it’s outdated.
2. The predefined EC2 Instance Type is a t2.medium.
3. The potential cost of running the instance is around $33.41 /month.
I recommend on **not using something smaller** than the t2.medium, even if you’re a single developer. GitLab will **not** perform correctly, and it will complain if it doesn’t have [4 GB of RAM (Believe me, it’s going to use it).](https://docs.gitlab.com/ee/install/requirements.html#memory) You *can* implement what it’s called a [Memory Swap if you select a t2.micro](https://docs.gitlab.com/ee/install/requirements.html#memory), but from personal experience **do not do it. It’s going to run like garbage.**
This is important, and out of the scope of this tutorial. I always recommend to set the IP accordingly to what you need. In the beginning, you can just “Create new based on seller settings”, and then adjust.
Click “Continue to Subscribe”, and you’ll see the confirmation page below:

Click on EC2 Console, and it’s going to send you to the main page from your EC2 instances.

If you decided to go with setting up the security group, then, scroll all the way to the right until you see “Security Groups”, and select the one from the instance.Example of the Security Groups. Click the one corresponding to your GitLab isntance.


What you want to do is “Edit inbound rules” and then assign for the SSH your own IP. For HTTP, you can apply the same restrictions for improved security, or leave it open and access it from anywhere.


#### #2 — Assigning an Elastic IP.
The reason why this is getting a section of its own, and it may feel out of place (This shows illustrations of an already setup GitLab instance) is because I messed up big with this one, and I had to dig into GitLab to fix it. You see, when you’re connecting via the IPV4, each time you stop and resume the instance, the **IP Address changes** (On AWS)
This may seem inoffensive at first, but there’s a **major problem**. GitLab **hardcodes the current URL** into the project.Screen when you’re creating a projectPay attention to the Project Path. It becomes hardcoded. If you stop and bring back up the instance, there **will be** a mismatch of the URL and the repo, and this is **going to** cause issues.


This brings the problem that when you try to push or pull from the repo, it’s going to come up with errors such as Not Found, or Permission Denied. Setting up an Elastic IP **before you do anything**, will save you from some demise. Not everything is lost, if you do screw up, there’s a method for you to fix it.
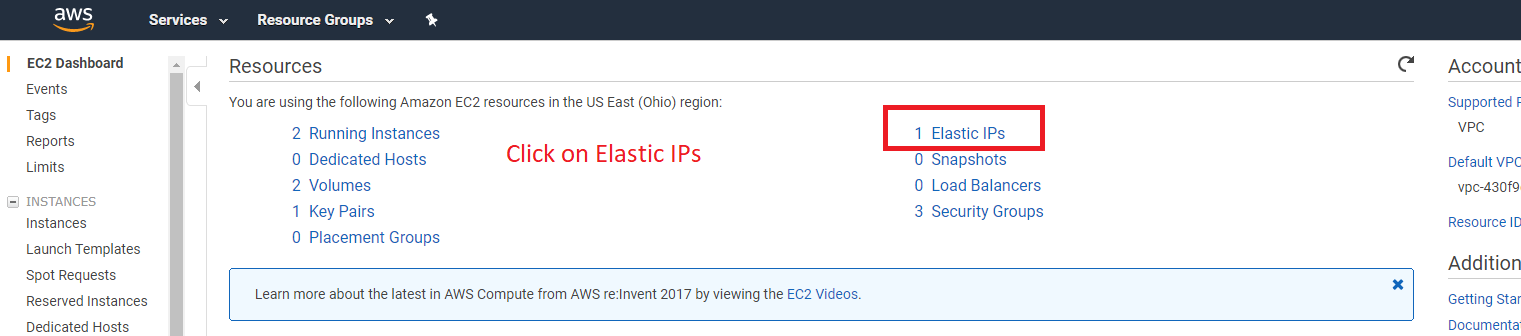
Go to “Services” in the top, and click “EC2” to bring you to the main EC2 page.

Click on “Elastic IPs”.
Then on “Allocate new address”

Press “Allocate”, and you’ll receive a confirmation message:

With the new IP Address selected, click “Actions”, and then “Associate address”.

Then, select the GitLab instance and assign the private IP.

That’s it! That’s going to save you a lot of headaches!
#### **#3— Connecting to the GitLab instance**
For this, you’re going to need [PuTTy ](https://www.chiark.greenend.org.uk/~sgtatham/putty/latest.html)or a similar program that can give you shell access (sh access). *I’m going to assume you’re going to be using PuTTy in this tutorial.*
From the aws page you just opened (The EC2 Instances page), you’re going to click on the newly created Instance (It shall appear blank. It’s the second on the picture above), and you’re going to look for the IPv4 address.

Where it says “login as:”, type “ubuntu”, and if you have a passphrase for your key (You should have one), type the password or copy paste it. *Note: It’s not going to show up in the terminal*.

#### #4- Updating Ubuntu
The current installation of Ubuntu is out of date, and it needs to be updated.
[First, create a backup image (In case the Server isn’t new)](https://gregrickaby.com/2013/05/safely-update-an-ubuntu-ec2-instance-on-amazon-aws/)
Then, from [here](https://askubuntu.com/a/777177):
```
sudo apt update
```
```
sudo apt dist-upgrade
```
```
sudo do-release-upgrade -d
```
*Note: This is **going to** take a while.*
If that doesn’t work (You don’t see anything happening), try with this: (Note that we omit the -d flag)
```
sudo do-release-upgrade
```
*Pay attention to the upgrade process as it it’s going to ask you to confirm a series of installations and upgrades. You could probably omit it with the “-y” flag.*
Such screens look like these:

Select “Yes”

Type “Y” and press Enter.

“Install the package maintainer’s version”, and hit enter

Type “y” and press “Enter”

This last Window will restart the server and will disconnect it from the console. You will have to close and open PuTTY again.
Check that the most recent version was installed by running:
```
lsb_release -a
```
As of this writing, the latest version is 16.0.4.4:

#### #5-Configuring GitLab for the first time
Once you have upgraded Ubuntu, then you need to configure GitLab:
```
sudo gitlab-ctl reconfigure
```
This process is going to take a while.Once it has finished, you will see “gitlab Reconfigured!”

Update and upgrade the packages:
```
sudo apt-get update
```
```
sudo apt-get upgrade
```
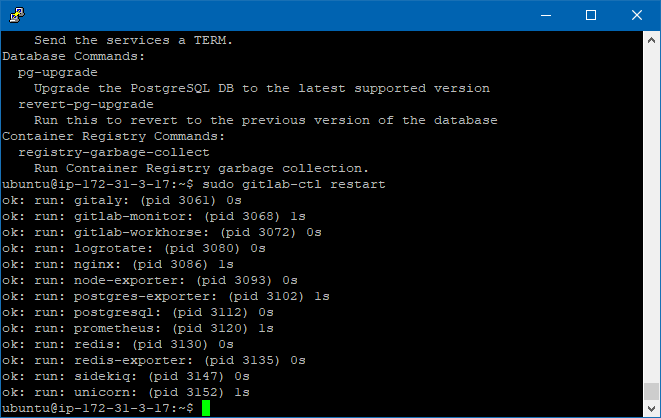
After that, just to be sure, restart the gitlab-ctl:
```
sudo gitlab-ctl restart
```
Now, access the project at the IPv4 address from your AWS (The same URL you used for PuTTY).Navigate with your browser to the same IPv4 URL Address

E.g: Navigate to:
**Access the default account with (If it asks you):**
```
Username: root
```
```
Password: 5iveL!fe
```
In this case, it didn’t ask us for the default credentials, but immediately prompted us with changing the password.This is going to be the default page


Once the main page has been loaded, navigate to the admin area, by adding “/admin” at the end of the URL.
Do it like this: (First your IP Address, then /admin)
```
http://ec2–20–156–206–47.us-east-2.compute.amazonaws.com/admin
```

You may have noticed the following:GitLab needs update.

That’s what we’re going to do next!
#### #6 — Updating GitLab
Let’s get back to PuTTY, and run some commands:
```
sudo apt-get update && sudo apt-get install gitlab-ce
```
This will check that we have everything up to date.
Then, we need to manually look for GitLab on [the following URL](https://packages.gitlab.com/gitlab/gitlab-ce?filter):[**gitlab/gitlab-ce - Packages · packages.gitlab.com**\
\&#xNAN;*APT/YUM repository for GitLab Community Edition packages*packages.gitlab.com](https://packages.gitlab.com/gitlab/gitlab-ce?filter)
And you’re going to look for the latest version, which as of this time is: 10.6.4.
Note, you need to match it to the version of Linux used. In our case, it was the Ubuntu Xenial release.
A way for you to know about it on Ubuntu machines is to run:
```
lsb_release -a
```
Running lsb\_release -a will give us the Ubuntu version.


Identify your distribution. In our case w’ere using Ubuntu Xenial Release. We click and follow the link.
We’ll see that GitLab provides us with some instructions on how to install it:

We do exactly as it says; We go to PuTTY and execute:
```
curl -s https://packages.gitlab.com/install/repositories/gitlab/gitlab-ce/script.deb.sh | sudo bash
```
```
sudo apt-get install gitlab-ce=10.6.4-ce.0
```
The | means that you get the standard output of the curl to bash.Let the beauty unfold! See how it installs!You shall be greeted with this awesome message!


Navigate to your new instance place!

#### #7 — The War is not over. — Connecting to GitLab
Whenever you connect to GitHub, it automatically creates what we call an SSH key (Secure Shell Key). It’s a mean for communicating directly with your repo without the need of a password. GitLab is no different, except that we need to **manually generate it** ourselves, and then paste them into our GitLab account. Failing to do so, we **won’t** be able to pull/push or do anything in the repo.
For this we’re going to need Bash, which we can use from Git. If you don’t have it, download [Git](https://git-scm.com/download/win) and install it. Open Bash:
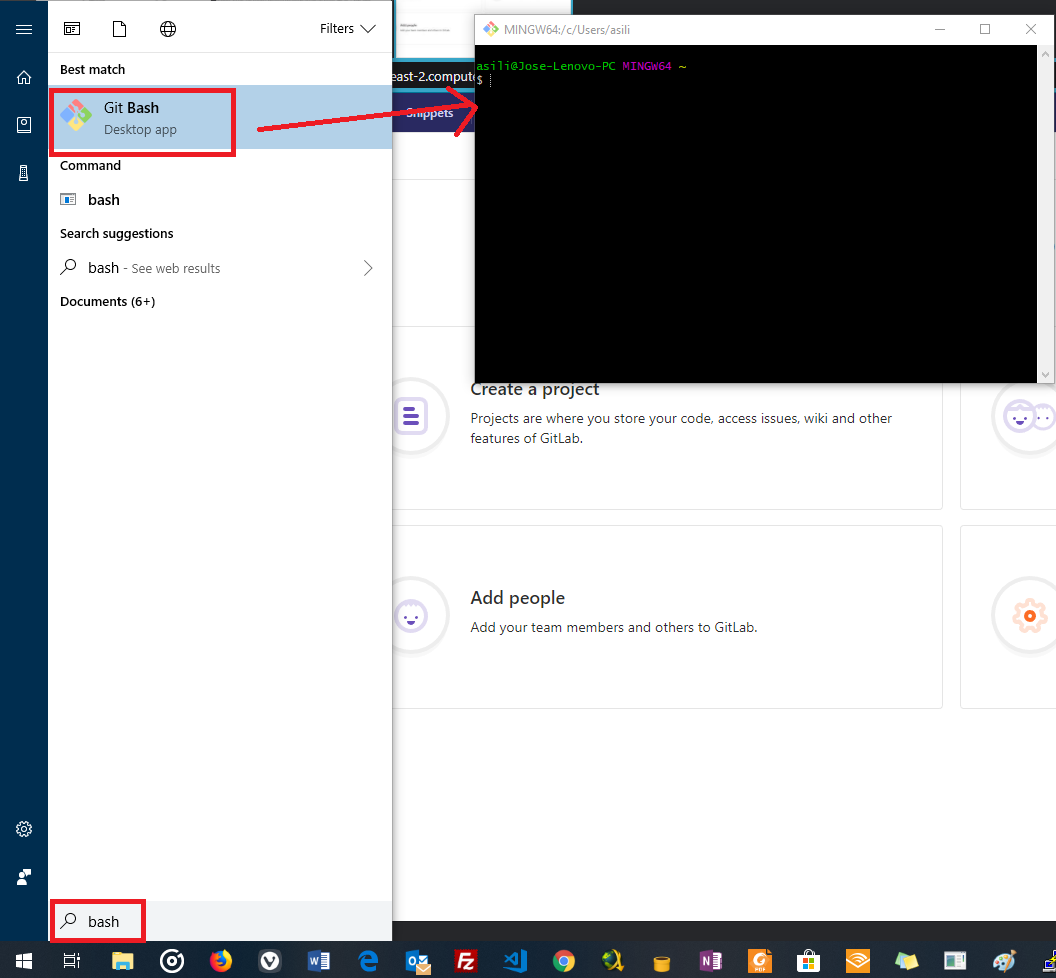
What we’re going to do is that we’re going to use Git Bash to generate the SSH keys for us, and we’re going to copy and paste it into GitLab.
In the Bash command, run:
```
ssh-keygen -t rsa -C “your_name@your_email.com”
```
Then, it’s going to ask you the file in which you want to save it. You can just press enter.

If you have or want to create multiple RSA keys, then you’ll need to specify a different name.
Note, unfortunately you’ll need to append the whole path to the new name, so it stores it into that location. Otherwise, it’s going to store it outside the .ssh folder (Not a big deal, just remember to move it into .ssh)
In English, what I mean is: In the textbox, if you want to name it id\_rsa\_gitlab, you’ll put it like this:
```
/c/Users/asili/.ssh/id_rsa_gitlab
```
Then, it’s going to ask you for some passphrase in case you want to protect it. After it finishes, it should show something like the image above.

Add the file(s) to SSH:
```
ssh-add ~/.ssh/id_rsa
ssh-add ~/.ssh/id_rsa_any_other_file_I_could_have_created
```
Once it’s done, you’re going to need to copy the contents of the id\_rsa\_gitlab.pub or id\_rsa\_.pub (The filename you specified), and paste them into GitLab.
You can either:
Type this in the GitBash command:
```
$ cat ~/.ssh/id_rsa.pub | clip
```
And this will copy the contents into your clipboard.
Or:

Locate the file, and open it with a text editor. *Sorry Publisher, but you won’t be able to open it*.

Now, go to your GitLab instance (via the browser), click on the icon at the top right, and select “Settings”:


Go to “SSH keys” at the left, and then paste the contents of the key into the textbox. **Note: You are going to do this for each machine that you connect to.** Each user will have to do this exact process of generating an SSH key and pasting it in their own profiles.

Click “Add Key”, and you’ll get something like this:

With this, you’ll be able to pull and push from the repo (As long as you have [permissions inside GitLab](https://docs.gitlab.com/ee/user/permissions.html)).
**You can safely skip to the next section if you are only going to use a single \_rsa key. If you’re using multiple of them, you need to add an extra step of configuration.**
In case that you have multiple RSA keys (SSH Keys), you’ll have to create a config file:
Go back to the .ssh directory (In my case was: C:\Users\asili\\.ssh), and create an empty and **extensionless** config file.
You can either:
Do it via Git Bash:
```
touch ~/.ssh/config
```
Or right click, New => Text Document, and remove the “.txt” extension.
Open the file with any text editor.
Inside it, copy and paste the following content:
```
# Root account
Host ec2–12–211–32–14.us-east-2.compute.amazonaws.com
HostName ec2–12–211–32–14.us-east-2.compute.amazonaws.com
PreferredAuthentications publickey
IdentityFile ~/.ssh/id_rsa
```
```
# superjose account
Host ec2–18–211–14–41.us-east-2.compute.amazonaws.com
HostName ec2–18–211–14–41.us-east-2.compute.amazonaws.com
PreferredAuthentications publickey
IdentityFile ~/.ssh/id_rsa_superjose
Host other_gitlab_repo.com
Hostname other_gitlab_repo.com
PreferredAuthentications publickey
IdentityFile ~/.ssh/id_rsa_rat
```
In there, you are going to replace the Host and Hostname values for your IPv4 addresses that you are using. This config file **is paramount**. Without this, you won’t be able to communicate to multiple hosts, as it will only use the id\_rsa file only.
**Note: You’re placing the private key (the extensionless file), not the .pub one.**
Some additional resources:
*
*
#### Configuring your existing Repo for GitLab
In case you are migrating from other repository to GitLab, you want to configure the [URL endpoints to point to the correct location](https://stackoverflow.com/a/2432799/1057052). You can do this by:
```
git remote set-url origin git@ec2-31-412-44-15.us-east-2.compute.amazonaws.com:project/my-project.git
```
Or, just edit the config file: .git/config

#### What if the repo URL is different from your actual URL?
---
# Agent Instructions: Querying This Documentation
If you need additional information that is not directly available in this page, you can query the documentation dynamically by asking a question.
Perform an HTTP GET request on the current page URL with the `ask` query parameter:
```
GET https://tkssharma-devops.gitbook.io/devops-training/devops-01-continuous-integration/continuous-integration-and-continuous-delivery/ci-cd-using-gitlab-ci-s3/install-gitlab-ob-ec2.md?ask=
```
The question should be specific, self-contained, and written in natural language.
The response will contain a direct answer to the question and relevant excerpts and sources from the documentation.
Use this mechanism when the answer is not explicitly present in the current page, you need clarification or additional context, or you want to retrieve related documentation sections.