DevOps Training
  • DevOps
  • What is DevOps
    • What DevOps Look like
    • Why DevOps Needed
    • DevOps Automation Tools
    • DevOps Principles
  • cloud computing
    • How DevOps links with Cloud Computing
    • What is cloud computing?
      • Platform as a service (PaaS)
      • Infrastructure as a service (IaaS)
      • Software as a service (SaaS)
      • Function as a Service
      • SaaS, PaaS, IaaS
  • Version Control
    • Git as Version Control
      • Setting up Remote Repo
      • Git Hooks
      • github vs gitlab vs bitbucket
      • Quick Recap Git
  • DevOps #01 Continuous Integration
    • Continuous Integration & Continuous Delivery
      • Understanding CI Tools
      • Prerequisite
      • Continuous Integration
      • CI Tools
      • Travis-CI
        • Travis CI with S3
        • Static Site Build S3
        • Beanstalk with AWS CLI
          • Elastic Beanstalk with Travis CI
        • Travis using Code Deploy EC2
          • Github and Code Deploy
          • Travis CI with Code Deploy
      • Gitlab-CI
        • CI Setup for application
        • Gitlab Runners on EC2
        • CI Integration with AWS
          • Deploying App using Gitlab CI
          • Gitlab CI with AWS S3
          • Gitlab CI with ECS
          • CI Integration with EC2
            • Update and Clean Gitlab.yml
        • Install Gitlab on EC2
      • CI/CD using Jenkins CI
        • Jenkins Build on EC2
        • Jenkins Build EC2 Ubuntu
        • Jenkins CI/CD
          • Create a Build Item
          • Create a Build Pipleine
            • Pipeline Using Docker
            • Pipeline Examples
          • Jenkins CI with S3
            • Jenkins CI - S3
          • Jenkins CI with EC2
    • Jenkins CI Cluster Mode
    • AWS Code Pipeline CI/CD
      • AWS CI/CD Tools
        • AWS Code Build
        • AWS Code Deploy to Beanstalk
        • AWS Code Deploy to EC2
        • AWS Pipeline - Example CI/CD
  • Docker
    • Docker
      • Docker for Developers
        • Install and setup
        • Docker Commands
        • Docker Images Container
        • Docker Architecture
    • Docker Demos
      • Node JS Container
    • Docker-compose
      • Using Docker Compose
      • Docker Compose Demo
  • AWS Quick Refresh
    • AWS Quick Recap - Videos
    • AWS Quick Recap
  • AWS Architecture - Lab
    • Application Deployment - 01
    • Application Deployment - 02
    • Application 3 tier Architecture
  • Basic Networking
    • Computer Networking for Beginners
      • Basic of Networking
      • Networking Protocols
      • OSI Model
      • Network address and Host address
      • Subnetting Type
    • Network Architecture
    • Networking Layers OSI Model
    • Internet protocol
      • CIDR and subnetting
        • Examples
      • AWS VPC Subnets
  • VPC and Networking
    • AWS VPC
    • VPC Demo
      • Bastion Host | Jump Server
  • AWS Components
    • AWS Components In Depth
      • AWS Storage
        • AWS EBS
        • AWS Cloudfront
        • AWS S3
      • AWS Compute
        • ECS
        • AWS VPC
          • VPC Components
        • AWS EC2
        • AWS ELB
          • Application Load balancer
            • Example
        • AWS EC2 Auto Scaling
          • Demo
        • AWS Route 53
        • AWS Lambda Serverless
          • AWS Lambda Serverless Computing
  • Assignments
    • Assignment 01-Node JS app on EC2
    • Assignment 02-Node JS with Mysql
    • Assignment-03
  • Microservices
    • Microservices Architecture
      • Docker and Docker-Compose
      • Docker-Compose Example 01
      • Docker-Compose Example 02
      • Hand-on | Building Microservices
    • Architecture Components
  • AWS ECS
    • AWS ECS
      • Introduction of ECS
Powered by GitBook
On this page

Was this helpful?

  1. DevOps #01 Continuous Integration
  2. Continuous Integration & Continuous Delivery
  3. CI/CD using Jenkins CI
  4. Jenkins CI/CD
  5. Jenkins CI with S3

Jenkins CI - S3

PreviousJenkins CI with S3NextJenkins CI with EC2

Last updated 5 years ago

Was this helpful?

Install the recommended plugins and create an Admin account in the following steps.

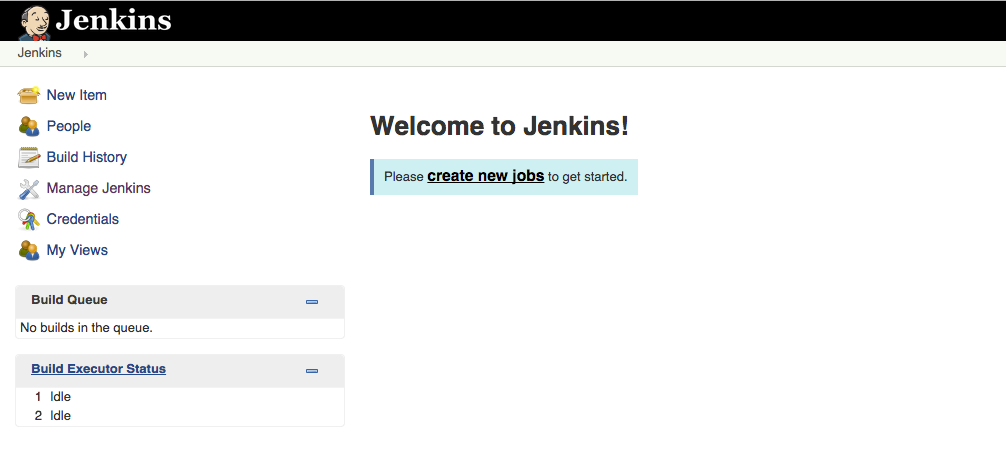
At this point you should be able to login an see the following page:Jenkins home page
Install Jenkins Plugins

At the Jenkins home page on the left menu select Manage Jenkins -> Manage Plugins select the tab Available and search for the following plugins:

Create the Pipeline AWS Jenkins Credential

At the Jenkins home page on the left menu click at Credentials->System,select the scope global and at the left menu again Add Credential:Create AWS Credential

withAWS(region:'<your-bucket-region>',credentials:'<Jenkins-Credential-ID-AWS>') {

The <Jenkins-Credential-ID> is the ID of the credential you’ve just created.

Blue Ocean Pipeline

Jenkins Blue Ocean UI makes it easier to create and configure a new pipeline.

If you create a Pipeline with Blue Ocean it will commit the Jenkinsfile to your repository and it will have a structure similar to the following:Jenkinsfile pipeline example

The above Jenkinsfile has a pipeline as you can see at the following image:Jenkins Blue Ocean Pipeline

 pipeline {
 agent {
    docker {
      image 'node:10-alpine'
      args '-p 20001-20100:3000 -u root' 
    }
  }
  environment {
    CI = 'true'
    HOME = '.'
    npm_config_cache = 'npm-cache'
  }
  stages {
    stage('chekout'){
       steps {
             git 'https://github.com/tkssharma/tkssharma-Profile-Create-React-App'
        }
    }
    stage('Install Packages') {
      steps {
        sh 'npm install'
      }
    }
    stage('Test and Build') {
      parallel {
        stage('Run Tests') {
          steps {
            sh 'npm run test'
          }
        }
        stage('Create Build Artifacts') {
          steps {
            sh 'npm run build'
          }
        }
      }
    }
    stage('Deployment') {
      parallel {
        stage('Staging') {
          when {
            branch 'staging'
          }
          steps {
            withAWS(region:'us-east-1',credentials:'jenkins-s3-push') {
              s3Delete(bucket: 'catchtheday.com', path:'**/*')
              s3Upload(bucket: 'catchtheday.com', workingDir:'build', includePathPattern:'**/*');
            }
            mail(subject: 'Staging Build', body: 'New Deployment to Staging', to: 'jenkins-mailing-list@mail.com')
          }
        }
        stage('Production') {
          when {
            branch 'master'
          }
          steps {
             withAWS(region:'us-east-1',credentials:'jenkins-s3-push') {
              s3Delete(bucket: 'catchtheday.com', path:'**/*')
              s3Upload(bucket: 'catchtheday.com', workingDir:'build', includePathPattern:'**/*');
            }
            mail(subject: 'Production Build', body: 'New Deployment to Production', to: 'jenkins-mailing-list@mail.com')
          }
        }
      }
    }
 }
}

The Pipeline above uses a docker agent to test the application and to create the final build files. The Deployment stage will remove the files from a given S3 bucket, upload the new build files and send an email to inform that a new deployment was successfully completed.

One thing to note is at the agent definition it used a port range is used to avoid the job to fail in case a given port is already in use

Setup the GitHub Webhook

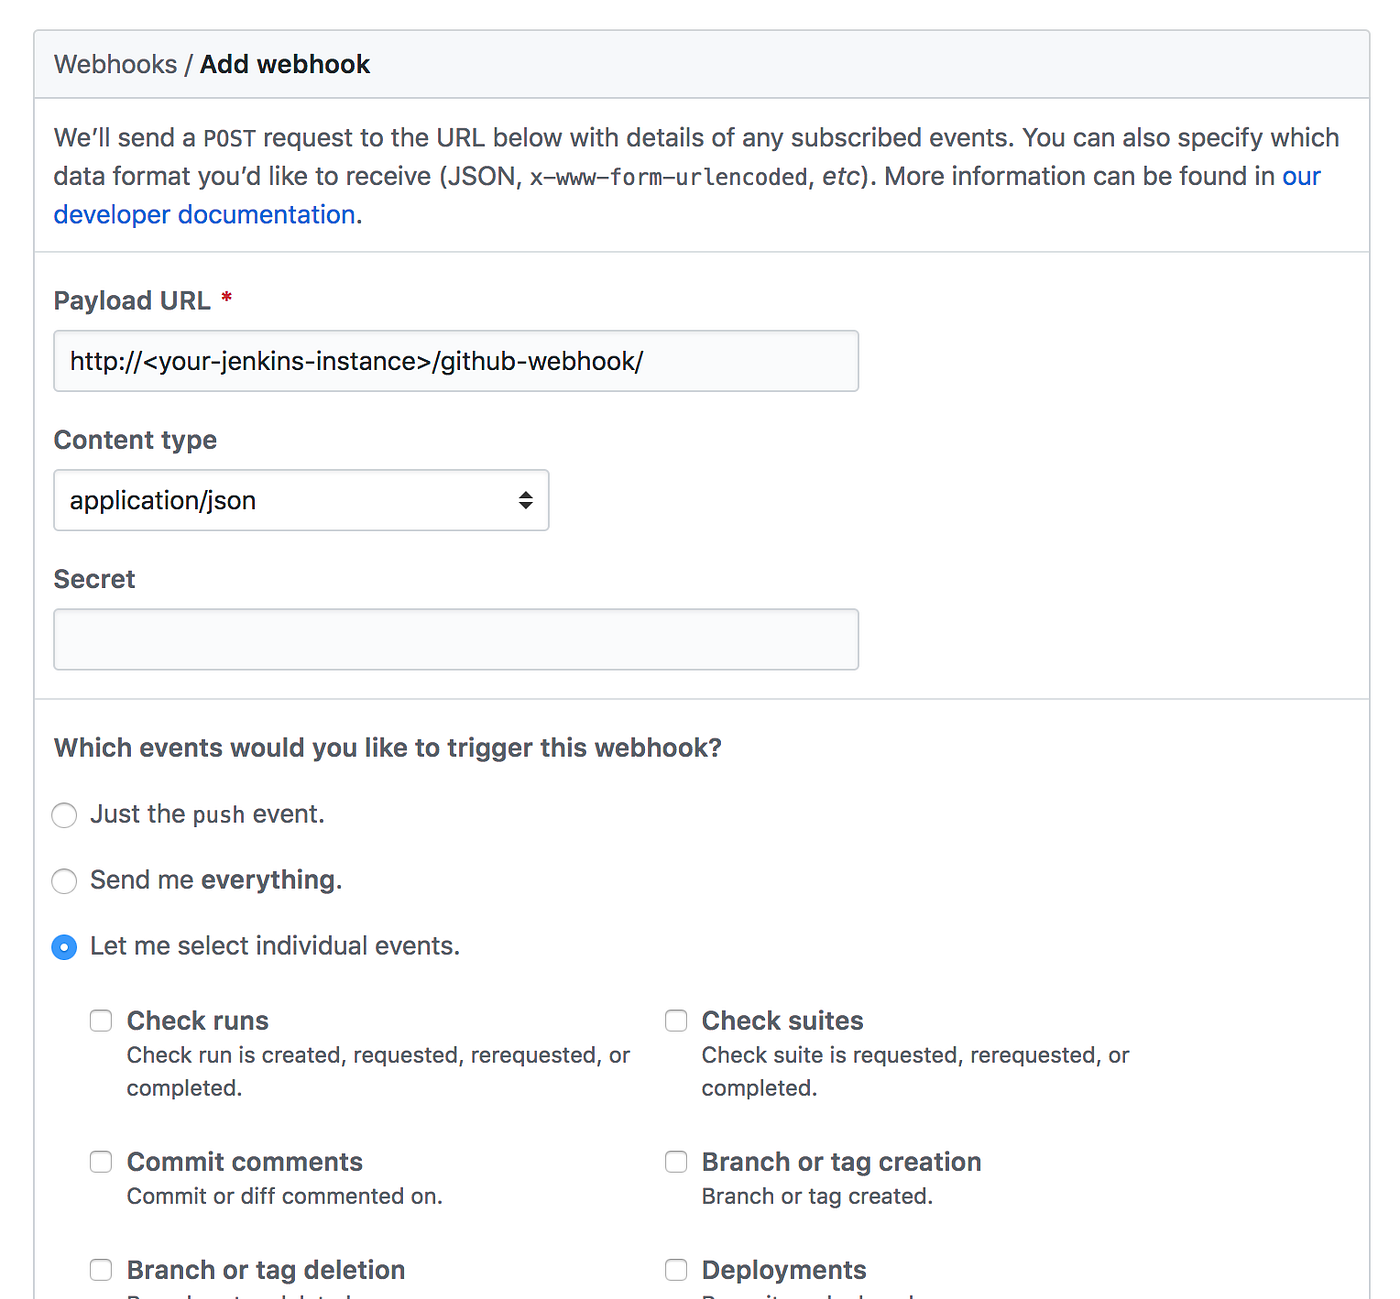
A WebHook is an HTTP callback: an HTTP POST that occurs when something happens; a simple event-notification via HTTP POST. A GitHub Webhook allows Jenkins to subscribe to repository events like Pushes and Pull Requests.

The Webhook will send a POST request to your Jenkins instance to notify that an action was triggered(PR, Push, Commit…) and it should run a new job over the code changes.

Select the individual events that you want to be used to trigger a new Jenkins build. I recommend to select Pushes and Pull Requests.

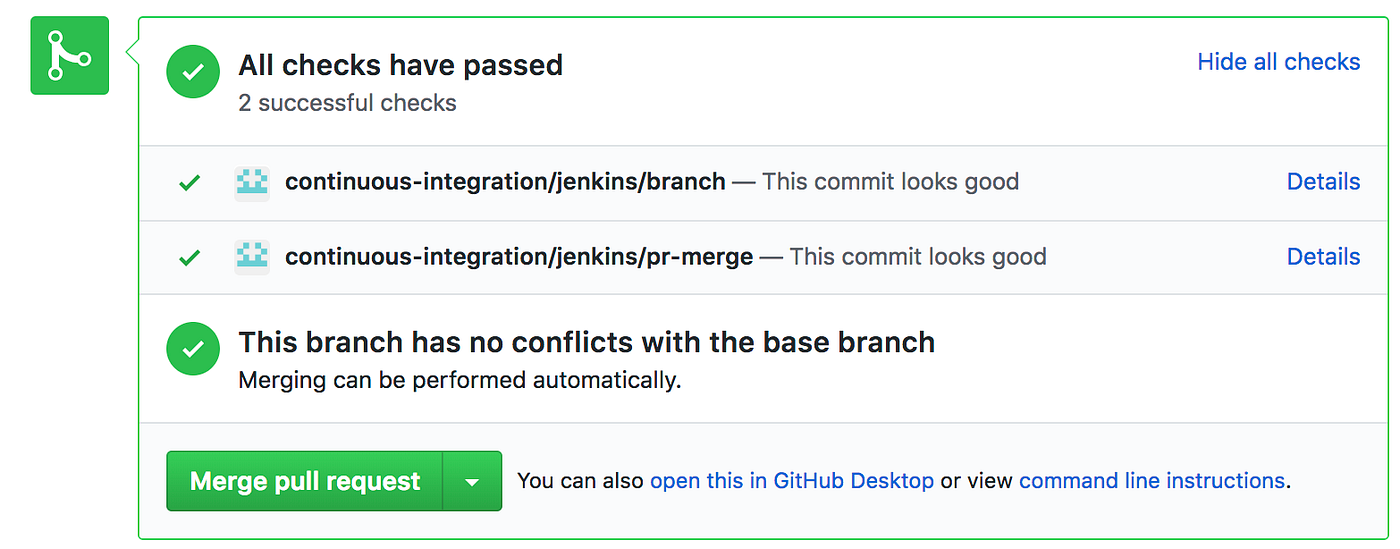
After that you will be able to see a similar message after a PR is created and it passes Jenkins validation:GitHub Pull Request Status

Create the S3 Bucket

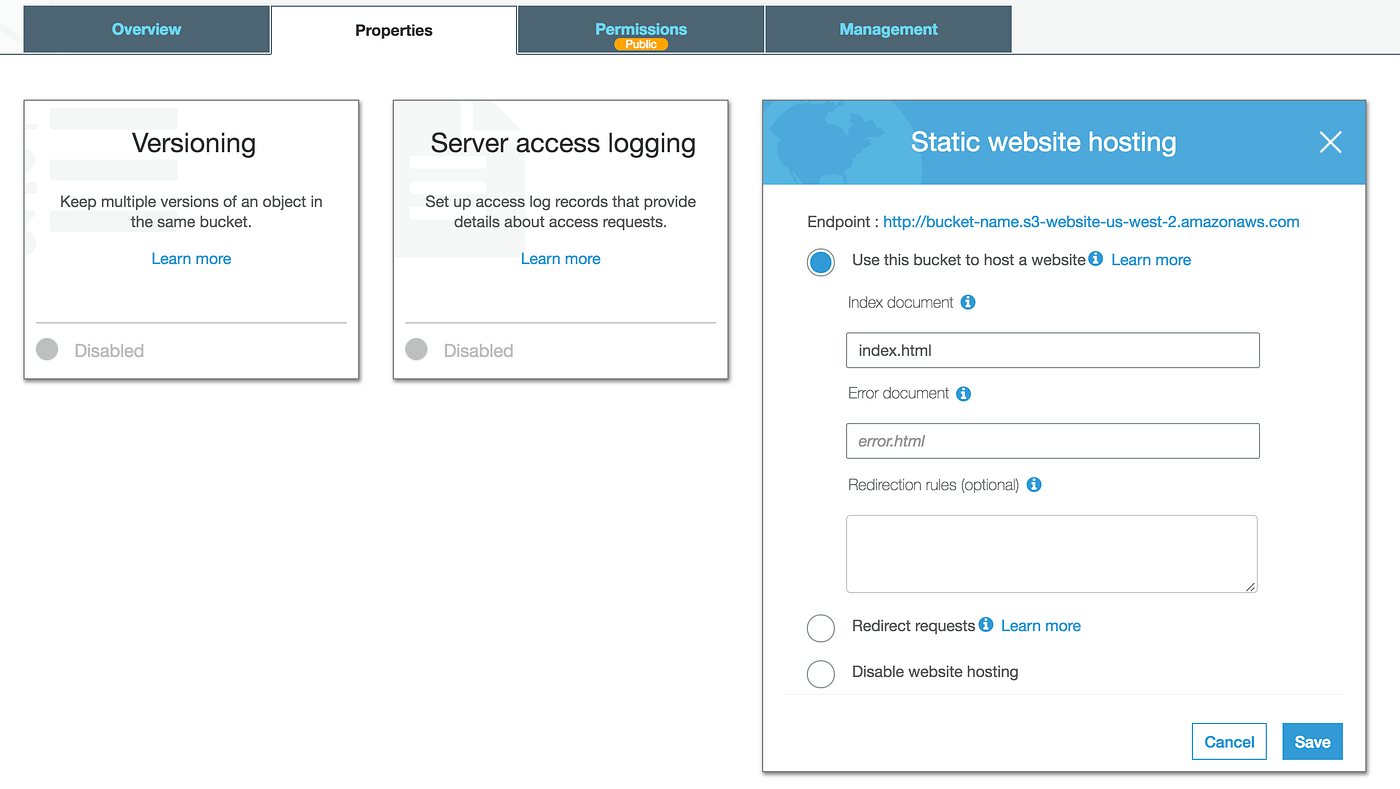
At your AWS console go to Services -> S3 and click the Create bucketbutton. Choose you bucket name and region, untick both options under the Manage public bucket polices for this bucket and finish the bucket creation. Open the bucket Properties, turn on the Static website hosting and define the index.html to point to your entry file like the following image: AWS S3 Bucket Properties — Static website hosting

At this point you should be able to access your website using you custom domain you via the bucket

http://<bucket-name>.s3-website-<region>.amazonaws.com

Conclusion

This process has multiple pros and cons and I would like to drop my two cents on this and highlight a couple of them.

Pros

  • Cheaper process with a good performance of a CDN to deliver static content.

  • AWS handles the traffic so scalability won’t be an issue.

Cons

  • Cache! Updates may take a while to be propagated as it has to wait the cache to expire.

  • Server side rendering. Bots and crawler won’t be able to get any metadata.

Despite the cache, that can be handled by setting to the index.html a short maxAge, this solution can be considered robust and sustainable as it takes advantages of multiple AWS resources to make its availability and scalability to follow high standards as it is required nowadays.

- New Jenkins UI

- AWS Integration

Provide the to allow Jenkins Pipeline AWS Plugin to access your S3 Bucket. At the above image, insert the created Access Key IDand the Secret Access Key. You can define and ID that will be used at the Jenkinsfile configuration as the following example:

Create a and select GitHub as repository

Enter a from GitHub to allow Jenkins to access and scan your repositories.

Follow the instructions and the Blue Ocean will look for a , if does not exists Blue Ocean allows you to define a new file and configure the Pipeline.

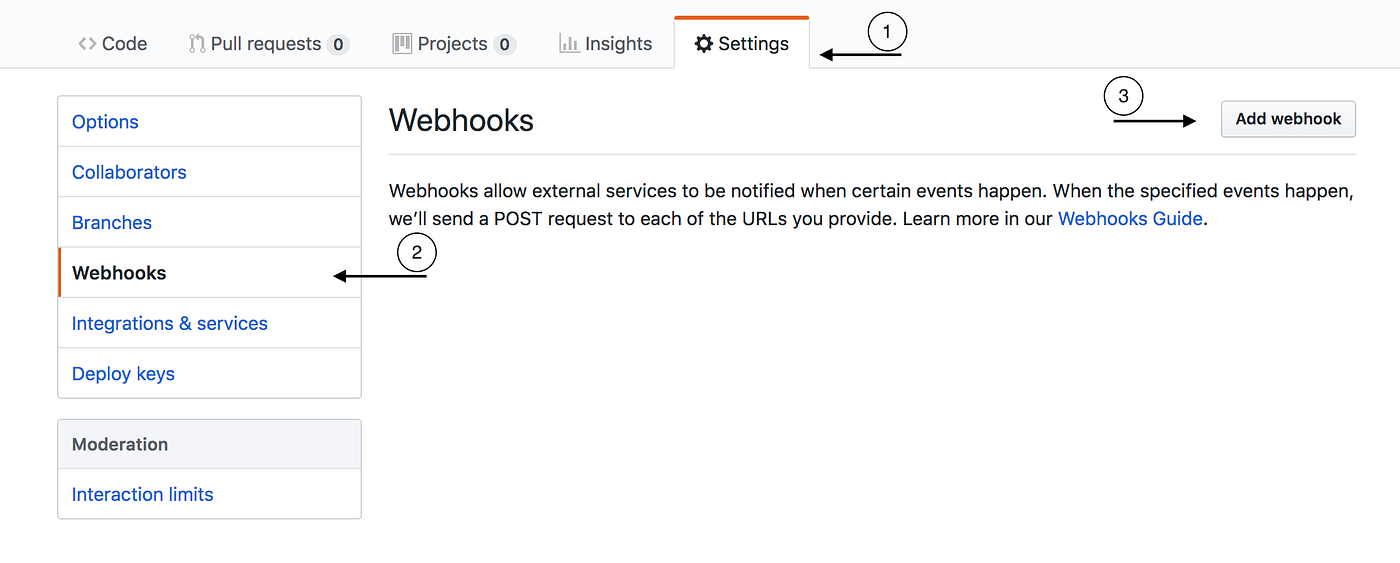
Go to you repository Settings, select Webhooks on the left menu and click on the button Add webhook.GitHub Repository Settings — Webhooks

Set the Payload URL to http://<your-jenkins-instance>/github-webkook/and the Content type to application/jsonGitHub Repository Settings — Create a Webhook
To use a custom domain name you need to create a second bucket and under Static website hosting select the Redirect requests option. That option allows you to define the domain that will be used to access the hosting bucket. Bear in mind that this secondary bucket will use a to redirect the requests.

Blue Ocean
Pipeline AWS
AWS IAM Credentials
new pipeline
Personal Access Token
Jenkinsfile
HTTP status code 301