DevOps Training
  • DevOps
  • What is DevOps
    • What DevOps Look like
    • Why DevOps Needed
    • DevOps Automation Tools
    • DevOps Principles
  • cloud computing
    • How DevOps links with Cloud Computing
    • What is cloud computing?
      • Platform as a service (PaaS)
      • Infrastructure as a service (IaaS)
      • Software as a service (SaaS)
      • Function as a Service
      • SaaS, PaaS, IaaS
  • Version Control
    • Git as Version Control
      • Setting up Remote Repo
      • Git Hooks
      • github vs gitlab vs bitbucket
      • Quick Recap Git
  • DevOps #01 Continuous Integration
    • Continuous Integration & Continuous Delivery
      • Understanding CI Tools
      • Prerequisite
      • Continuous Integration
      • CI Tools
      • Travis-CI
        • Travis CI with S3
        • Static Site Build S3
        • Beanstalk with AWS CLI
          • Elastic Beanstalk with Travis CI
        • Travis using Code Deploy EC2
          • Github and Code Deploy
          • Travis CI with Code Deploy
      • Gitlab-CI
        • CI Setup for application
        • Gitlab Runners on EC2
        • CI Integration with AWS
          • Deploying App using Gitlab CI
          • Gitlab CI with AWS S3
          • Gitlab CI with ECS
          • CI Integration with EC2
            • Update and Clean Gitlab.yml
        • Install Gitlab on EC2
      • CI/CD using Jenkins CI
        • Jenkins Build on EC2
        • Jenkins Build EC2 Ubuntu
        • Jenkins CI/CD
          • Create a Build Item
          • Create a Build Pipleine
            • Pipeline Using Docker
            • Pipeline Examples
          • Jenkins CI with S3
            • Jenkins CI - S3
          • Jenkins CI with EC2
    • Jenkins CI Cluster Mode
    • AWS Code Pipeline CI/CD
      • AWS CI/CD Tools
        • AWS Code Build
        • AWS Code Deploy to Beanstalk
        • AWS Code Deploy to EC2
        • AWS Pipeline - Example CI/CD
  • Docker
    • Docker
      • Docker for Developers
        • Install and setup
        • Docker Commands
        • Docker Images Container
        • Docker Architecture
    • Docker Demos
      • Node JS Container
    • Docker-compose
      • Using Docker Compose
      • Docker Compose Demo
  • AWS Quick Refresh
    • AWS Quick Recap - Videos
    • AWS Quick Recap
  • AWS Architecture - Lab
    • Application Deployment - 01
    • Application Deployment - 02
    • Application 3 tier Architecture
  • Basic Networking
    • Computer Networking for Beginners
      • Basic of Networking
      • Networking Protocols
      • OSI Model
      • Network address and Host address
      • Subnetting Type
    • Network Architecture
    • Networking Layers OSI Model
    • Internet protocol
      • CIDR and subnetting
        • Examples
      • AWS VPC Subnets
  • VPC and Networking
    • AWS VPC
    • VPC Demo
      • Bastion Host | Jump Server
  • AWS Components
    • AWS Components In Depth
      • AWS Storage
        • AWS EBS
        • AWS Cloudfront
        • AWS S3
      • AWS Compute
        • ECS
        • AWS VPC
          • VPC Components
        • AWS EC2
        • AWS ELB
          • Application Load balancer
            • Example
        • AWS EC2 Auto Scaling
          • Demo
        • AWS Route 53
        • AWS Lambda Serverless
          • AWS Lambda Serverless Computing
  • Assignments
    • Assignment 01-Node JS app on EC2
    • Assignment 02-Node JS with Mysql
    • Assignment-03
  • Microservices
    • Microservices Architecture
      • Docker and Docker-Compose
      • Docker-Compose Example 01
      • Docker-Compose Example 02
      • Hand-on | Building Microservices
    • Architecture Components
  • AWS ECS
    • AWS ECS
      • Introduction of ECS
Powered by GitBook
On this page
  • Jenkins Project Build Type
  • Create your initial Pipeline as a FreeStyle Project
  • Creating a Freestyle Build Job
  • Lets add Github Trigger to run Jenkins Pipeline

Was this helpful?

  1. DevOps #01 Continuous Integration
  2. Continuous Integration & Continuous Delivery
  3. CI/CD using Jenkins CI
  4. Jenkins CI/CD

Create a Build Item

PreviousJenkins CI/CDNextCreate a Build Pipleine

Last updated 5 years ago

Was this helpful?

Jenkins Project Build Type

  • Freestyle Project

  • Pipeline Project

Create your initial Pipeline as a FreeStyle Project

A Jenkins project is a repeatable build job which contains steps and post-build actions. The types of actions you can perform in a build step or post-build action are quite limited. There are many standard plugins available within a Jenkins freestyle project to help you overcome this problem. They allow you to configure build triggers and offers project-based security for your Jenkins project.

Creating a Freestyle Build Job

The freestyle build job is a highly flexible and easy-to-use option. You can use it for any type of project; it is easy to set up, and many of its options appear in other build jobs.

Step 1) To create a Jenkins freestyle job, log on to your Jenkins dashboard by visiting your Jenkins installation path. Usually, it will be hosted on localhost at If you have installed Jenkins in another path, use the appropriate URL to access your dashboard.

Step 2) Click on "New Item" at the top left-hand side of your dashboard

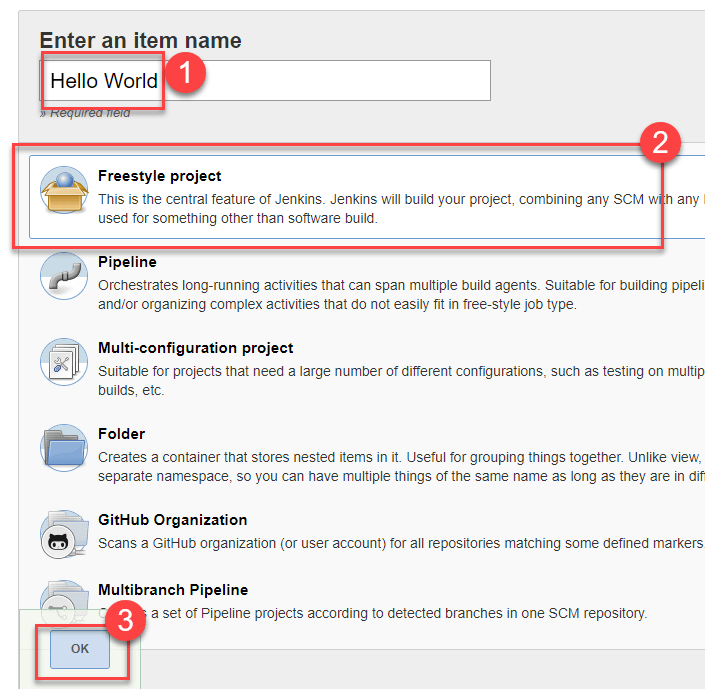
Step 3) In the next screen,

  1. Enter the name of the item you want to create. We shall use the "Hello world" for this demo.

  2. Select Freestyle project

  3. Click Okay

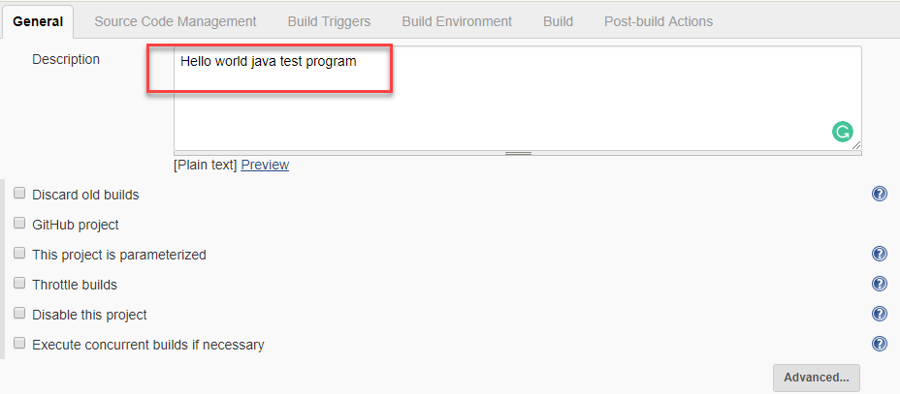
Step 4) Enter the details of the project you want to test.

Step 5) Under Source Code Management, Enter your repository URL. We have a test repository located at my repo

It is also possible for you to use a local repository.

If your GitHub repository is private, Jenkins will first validate your login credentials with GitHub and only then pull the source code from your GitHub repository.

Step 6) Now that you have provided all the details, it's time to build the code. Tweak the settings under the build section to build the code at the time you want. You can even schedule the build to happen periodically, at set times.

Under build,

1. Click on "Add build step"

2. Click on "Execute Shell command" and add the commands you want to execute during the build process.

Step 7) When you have entered all the data,

  1. Click Apply

  2. Save the project.

Step 8) Now, in the main screen, Click the Build Now button on the left-hand side to build the source code

Step 9) After clicking on Build now, you can see the status of the build you run under Build History

Step 10) Click on the build number and then Click on console output to see the status of the build you run. It should show you a success message, provided you have followed the setup properly

Lets add Github Trigger to run Jenkins Pipeline

Just save this and send git commits to this repo, it will trigger Jenkins Build and you will se Build running on Jenkins console

http://localhost:8080
Create webhook on github