Docker and Docker-Compose
Dockerising a Node.js and MongoDB App
This post serves as a ‘getting started’ guide to dockerising an application.
I will run through some basic Docker terminology and concepts and then use a Node.js and MongoDB application that I previously built and demonstrate how to run this in a Docker container.
A quick overview of containers and why we would want to use them:
Containers such as Docker let us package up entire applications, including the application’s libraries, dependencies, environment and everything else needed by the application to run.
Source: Docker
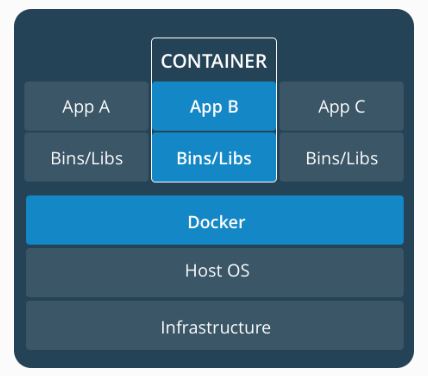
So we can think of containers as portable, packaged bits of functionality.
Containers isolate the application from the infrastructure beneath so we can run our application on different platforms without having to worry about the underlying systems.
This allows consistency between environments, for example, a container can be easily moved from a development environment to a test environment and then to a production environment. Containers can also be easily scaled in response to increased user load and demand.
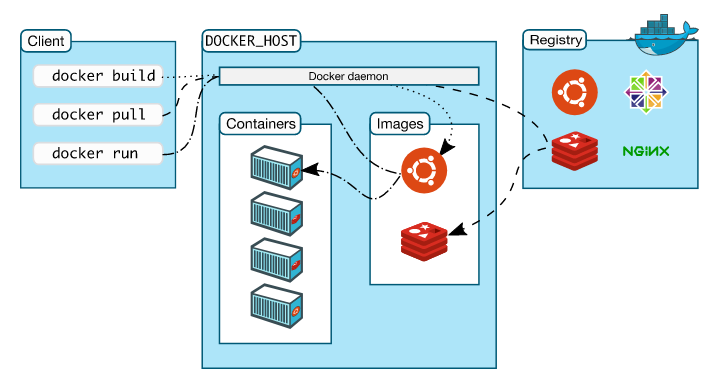
To create a Docker container, we will use a Docker image, and to build a Docker image, we will use a Dockerfile. An image is made up of a set of layers and each instruction in a Dockerfile adds a layer to the image.
These images can be stored in a registry for ease of discovery and sharing purposes. Examples of registries include the official Docker Hub registry, or the Amazon EC2 Container Registry or even an internal organisation registry.
An image is essentially a snapshot of a container and a container is a running instance of an image.
Source: Docker
Before we start, a quick introduction to the Node.js application itself, which I built this using this tutorial but the sample project is also available to fork from GitHub.
The application serves as a (very!) basic content management system.
Using the interface below, we can add new users…

…and upon hitting the Submit button, we can view the list of users added, all of which are persisted in MongoDB.
For testing purposes, I have added some dummy names as shown here.

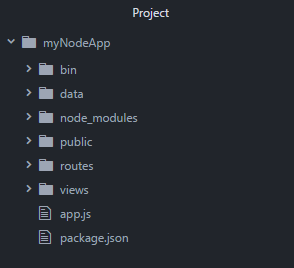
Looking at the application structure, we can see the package.json file, which contains all the dependencies we need to run the application.
To run this application in a Docker container, we will write a Dockerfile using the official node image from the Docker Hub registry. We will then use Docker Compose, a tool for running multi-container applications, to spin up our containers and run our app.
Let’s create a Dockerfile in the project directory.
We are essentially using a bunch of instructions to build our own nodeimage.
FROM lets us specify which base image from Docker Hub we want to build from. In our case, we are using the latest version of the official node image.
RUN lets us execute a command, which in our case is to create a new directory.
WORKDIR sets this newly created directory as the working directory for any COPY, RUN and CMD instructions that follow in the Dockerfile.
COPY is pretty straightforward and lets us copy files or a whole directory from a source to a destination. We are going to COPY the package.json file over to our working directory.
RUN lets us execute the npm install command which will download all the dependencies defined in package.json.
COPY lets us copy our entire local directory into our working directory to bundle our application source code.
EXPOSE exposes a port which the container will listen on.
And finally, CMD sets the default command to execute our container.
That’s the Node part done, now for MongoDB.
We could build our own mongo image but wherever possible, we should look to use official images.
This is beneficial as it saves us a fair amount of time and effort — we don’t have to spend time creating our own images or worry about the latest releases or applying updates. All of that is taken care of by the publisher of the image.
Additionally, there is usually information available on how to best use images in the Docker Hub repository and in the Dockerfile itself, simplifying the process even further.
Let’s take a look at the standard mongo image from Docker Hub. Most of the commands in this Dockerfile should be familiar as we used them in our own Dockerfile but there are a few new ones.
The one I’d like to point out is VOLUME /data/db /data/configdb.
Here, the creator of the image is identifying two mount points — one to persist data between restarts and the other to make it easy to update configuration files. The VOLUME instruction itself is not doing anything but it gives the user (us) a hint as to where we might mount persistent storage, which we will do below.
Let’s add a docker-compose.yml file to define the services in our application.
Breaking this down, what we are doing here is
defining a service called
app,adding a container name for the
appservice as giving the container a memorable name makes it easier to work with and we can avoid randomly generated container names (Although in this case,container_nameis alsoapp, this is merely personal preference, the name of the service and container do not have to be the same.)instructing Docker to
restartthe container automatically if it fails,building the
appimage using the Dockerfile in the current directory andmapping the host port to the container port.
We then add another service called mongo but this time instead of building our own mongo image, we simply pull down the standardmongo image from the Docker Hub registry.
For persistent storage, we mount the host directory /data (this is where the dummy data I added when I was running the app locally lives) to the container directory /data/db, which was identified as a potential mount point in the mongo Dockerfile we saw earlier.
Mounting volumes gives us persistent storage so when starting a new container, Docker Compose will use the volume of any previous containers and copy it to the new container, ensuring that no data is lost.
Finally, we link the app container to the mongo container so that the mongoservice is reachable from the app service.
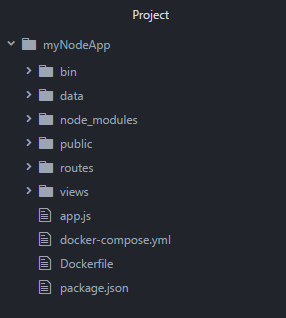
After adding the Dockerfile and docker-compose.yml to the project directory, the project structure now looks like this:
We can now navigate to the project directory, open up a terminal window and run docker-compose up which will spin up two containers and aggregate the logs of both containers.
we should now be able to see the newly added user in addition to the users which were added before the application was containerised.
An interesting point to note is that if you stop your containers ctrl c and run docker-compose up again, you will notice that the build happens much faster this time.
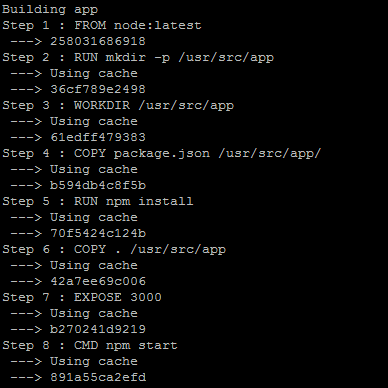
This is because Docker caches the results of the first build of a Dockerfile and subsequently uses this cache the next time round, saving valuable time.
To summarise, in this post we have
reviewed useful Docker terminology and concepts
written a simple
Dockerfileused Docker Compose to define our services
and successfully dockerised our application.
For further reading, please refer to documentation on the official Docker website.
Last updated