
Using Docker Compose
What is Docker Compose?
Essentially, what Docker Compose is, is a recipe card — it’s a recipe of services that make up an application and the docker-compose.yml dictates how the services are mixed together.
In more technical terms:
Docker-Compose defines a complete system where services can communicate with each other on an isolated network, interacting with external resources as defined by the user.
Docker Compose is built on top of the Docker Engine, the very same engine that runs the Dockerfiles and Docker CLI, but the most important aspect to keep in mind about Compose is to think of it like a recipe.
The image below, illustrates it pretty well.
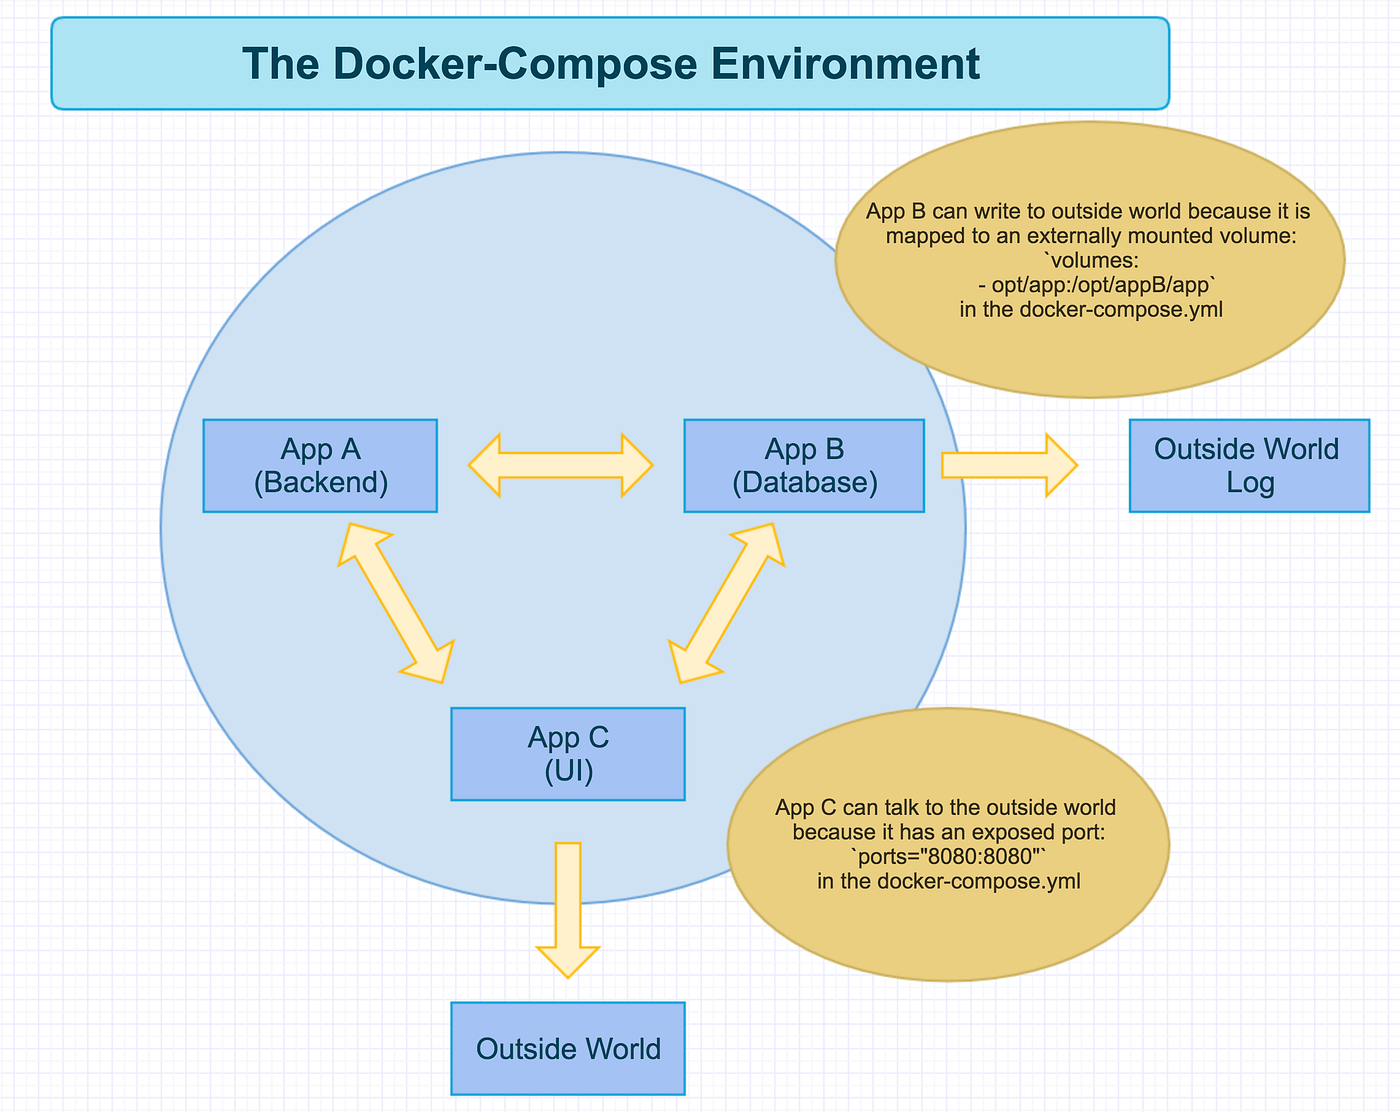
Above is what a Docker Compose environment looks like when running. Application A is a backend micro service that can freely communicate with App B and App C but that is all, it cannot communicate with the host in the outside world at all. This is because of how its docker-compose.yml is set up, I’ll show that next.
Application B is a database, it has been structured in the docker-compose.yml with an externally mounted volume volumes: — opt/app:/opt/appB/app that allows it to write a persistent data layer to the outside world. With this data layer in the application, even if the entire Docker environment is destroyed for some reason, when it’s brought back up, the database will see the data written to it before, and replace it so you can begin where you were before.
Finally, Application C is the user interface portion of the app. Also, due to the docker-compose.yml, this application can talk to the host machine on a port that’s been exposed: ports="8080:8080". This means, a user can open up http://localhost:8080 on their machine and access the running application.
And that’s what the environment looks like. This is a pretty simple representation, but it can be that simple, or it can be much more complex depending on your needs. Now, let’s look at what a Docker Compose YAML file looks like and go through some of the nuances that can come with it.
How to Docker Compose?
The last big question is: how to write a docker-compose.yml, and it’s actually very easy and follows a standard formula.
Here is a template of what any docker-compose.yml will look like.
Sample Docker Compose Template

Every docker-compose file will start with a minimum of version: "2", if you’re doing a Docker Swarm file it will need version: "3", but for a single docker-compose.yml, you’ll need v2.
Next, you will list all your services (each app running in the docker-composewill have its own name, and you’ll need to provide either a build or an image from the Docker registry. You cannot have both.
A custom Docker image will be built based on the Dockerfile provided by the build path OR
Docker hub will supply all the necessary commands and setup to make the image build and run successfully.
Underneath that, environment variables are set, ports are exposed, and external volumes are mounted. All these same things could be done with the Docker CLI, but this is a cleaner, easier to read file that doesn’t require remembering (and correctly typing) them all when executing commands in the terminal.
Here is what a sample docker-compose.yml could look like.
Sample Docker Compose Yaml
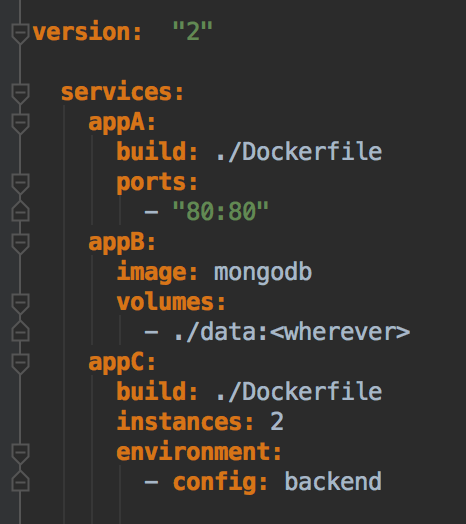
This docker-compose.yml begins with version: "2" (as required for Docker Compose), and then we have three services listed below: appA, appB, appC. Since appA is the UI that is built from a custom Dockerfile and needs to be exposed to the host machine, it has a build: path to said Dockerfile and a ports: that maps the internally running port of the UI, port 80 to the same port on the host machine, also 80.
appB is a mongo database, so it can be pulled down from the Docker registry when it’s time to start up the application. There’s no build to be done ahead of time, nothing but declaring the image, and for data persistence adding a volumes: specification of where database data can be persisted to the host machine and it’s good to go.
And appC is also a custom Docker image, so it has a build: path to its own Dockerfile, an environment: variable specifying a configuration file for the backend, and not one but two instances:. This application in particular can have two instances because it is not being exposed in any way to the host machine. If a port was being opened (or it was some type of database), it would only be able to have one instance to avoid port collisions on the host or to avoid writing to two separate databases within the Docker environment. But since this is purely a backend service, it can have as many instances as necessary (good for load balancing heavy volumes of traffic), and all of them can run as separate containers within the Docker environment and communicate with each other as needed.
I recommend reading the Docker Compose documentation for more examples and descriptions of all the things you can do with within a docker-compose.yml.
Ok, the docker-compose.yml has been written, let’s look at the Docker Compose commands needed to get this system up and running. Don’t worry, they’re not very complicated.
Docker Compose Commands
Before I go any further, I must issue the following disclaimer.
DISCLAIMER: For the purposes of this blog post, it will be assumed all docker-compose commands will be executed in the same directory as the docker-compose.yml. Yes, it is possible to execute the commands from different levels of the directory, but that is outside of the scope of this blog about Docker Compose.
Now that that’s been made clear, I can continue. There’s just a handful of Docker commands you’ll need to type in to the terminal to get these magical files to do their thing. And after I’ve described them, I’ve provided another handy graphic that illustrates the three different phases a Docker Compose environment can exist in.
docker-compose ps— lists all the services in a network. This is especially helpful when troubleshooting a service as it will give you the container ID and you can then rundocker -it exec <ID> bashto enter the container and debug as needed.docker-compose build— generates any needed images from customDockerfiles. It will not pull images from the Docker hub, only generate custom images.docker-compose up— brings up the network for the services to run indocker-compose stop— stops the network and saves the state of all the servicesdocker-compose start— restarts the services and brings them back up with the state they had when they were stoppeddocker-compose down— burns the entire Docker network with fire. The network and all the services contained within are totally destroyed.

Here’s the various states the Docker Compose environment exists in, depending on what commands you’ve run.
docker-compose build and docker-compose down mean the Docker environment is not running, and the network does not exist.
docker-compose up and docker-compose start means the Docker environment is running, and the network does exist.
docker-compose stop means the Docker environment is not running, but the network still does exist.
That’s it. All the commands you’ll need with your docker-compose.yml to build and run all your connected microservices.
Docker Compose Examples

Example - 01
Without docker compose , we will build image from docker file and run it
Example -2
Our basic docker-compose file to spin Node js and java container
Example -3
Last updated