AWS Route 53
What Is Amazon Route 53?
Amazon Route 53 is a highly available and scalable Domain Name System (DNS) web service. You can use Route 53 to perform three main functions in any combination: domain registration, DNS routing, and health checking. If you choose to use Route 53 for all three functions, perform the steps in this order:
1. Register domain names
Your website needs a name, such as example.com. Route 53 lets you register a name for your website or web application, known as a domain name.
For an overview, see How Domain Registration Works.
For a procedure, see Registering a New Domain.
For a tutorial that takes you through registering a domain and creating a simple website in an Amazon S3 bucket, see Getting Started with Amazon Route 53.
2. Route internet traffic to the resources for your domain
When a user opens a web browser and enters your domain name (example.com) or subdomain name (acme.example.com) in the address bar, Route 53 helps connect the browser with your website or web application.
For an overview, see How Internet Traffic Is Routed to Your Website or Web Application.
For procedures, see Configuring Amazon Route 53 as Your DNS Service.
3. Check the health of your resources
Route 53 sends automated requests over the internet to a resource, such as a web server, to verify that it's reachable, available, and functional. You also can choose to receive notifications when a resource becomes unavailable and choose to route internet traffic away from unhealthy resources.
Working with Amazon’s Route 53
When you’ve found a domain name that fits your needs and Route 53 confirms that it’s available, add it to your cart and follow along through the checkout process to submit your payment for your first year’s registration fee (domain registrations usually cost between $10 and $15 a year and are not included in Free Tier usage). In a short while, your new domain will show up in the Route 53 dashboard.
Configuring your hosted zone
While your domain is now good and registered, you haven’t yet told it what to do with incoming requests. So, from the dashboard, click on “Hosted zones” and then “Create Hosted Zone.” Fill in your domain name and, assuming you want your domain to be publicly available, select “Public Hosted Zone” in the pull down menu you can see in figure 1.Figure 1. The “Create Hosted Zone” page where you supply the basic data for your domain.

By the way, just what is a hosted zone? It’s the way AWS describes the information you provide to define how traffic aimed at your domain name will be managed.
Configuring Record Sets
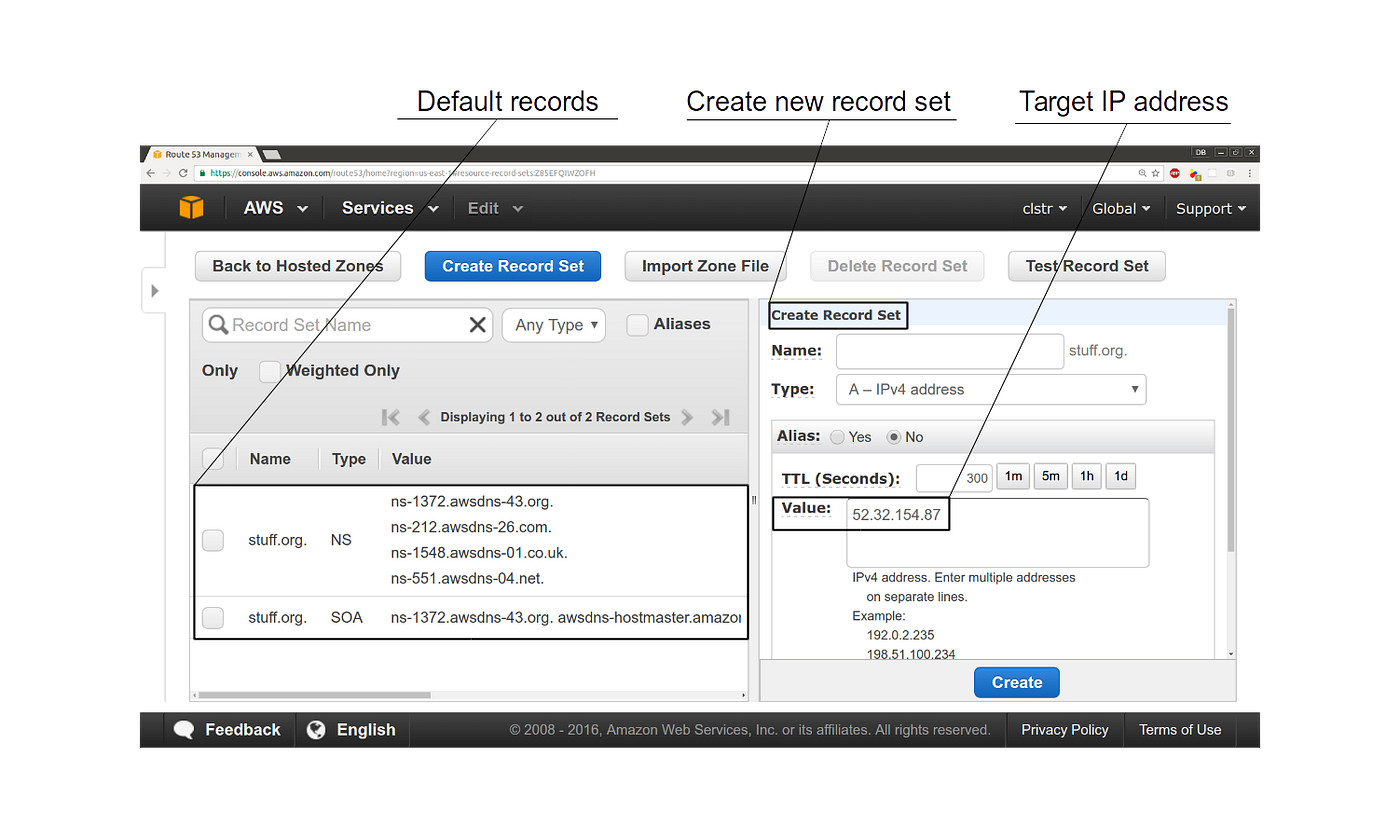
When you click on the link to your new hosted zone, you’ll find yourself on a page with two pre-created record sets: SOA (Start of Authority), identifying your domain’s basic DNS configuration information; and NS, the list of authoritative name servers that can be queried about your domain host (these are the public services that provide answers to domain name translation requests).
If you are going to use a domain that’s been registered with another provider, you’ll need to copy the four NS records you see here and import them into the appropriate interface page of your provider’s account management site. This will tell Internet routers to direct any traffic aimed at your domain name to Route 53’s name servers.
We’ll need to add at least one more record. A “record set”, by the way, is a set of structured data that defines a particular aspect of domain behavior.
As you can see from figure 2, I’ve created a hosted zone for a made-up domain — stuff.org — that’s already been given NS and SOA records. Naturally, we wouldn’t get too far in the real world with stuff.org (I’m sure someone already owns it), but it’ll do nicely for this demonstration. We will now need to add a new record that will tell anyone using our domain name servers (by pointing their browsers to stuff.org) to request the IP address used by our web server. To do that, click the “Create Record Set” button and a new panel will appear on the right (it’s already visible in my example).Figure 2. The Resource Set administration page. Here’s where you add or edit the resource sets for your hosted zone.

Since our website is accessible via a normal IPv4 IP address (as opposed to IPv6 or some other kind of resource type), we’ll select an A record type and enter our site’s public IP address into the Value box. Leaving the “Name” box empty will apply the rules of this record to requests for “stuff.org” only (as opposed to a sub domain like anothername.stuff.org or, as we’ll soon see, www.stuff.org).
The TTL (“Time To Live”) rule determines how long a target value (like, for instance, the value of a DNS record provided by a name server) will remain valid before it’s automatically refreshed. The higher the value (meaning the more time you allow between refreshes), the lower your cost. However, that also means that changes to records (i.e. updates between pages) will take longer to be noticed by end users.
It might take a few hours for the new rules to propagate through enough public records to reliably direct traffic to your site. You can always test it by simply pointing your own browser to your domain name to see what happens.
Record sets: other use cases
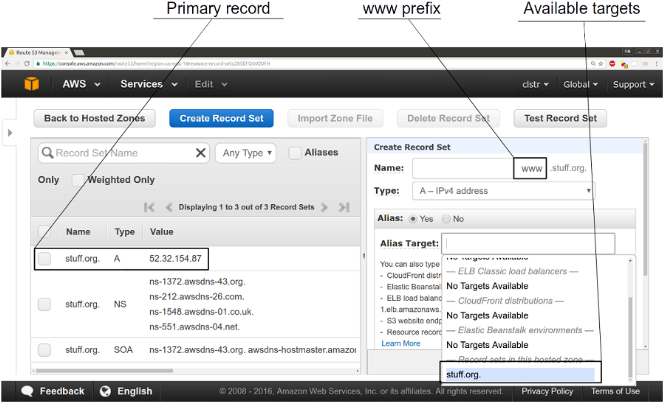
Now, you might be surprised to know that the way things sit right now, only browser requests using the stuff.org address will be successful, but www.stuff.org will not! That’s because “www” doesn’t really play any significant role in Internet addressing, and is treated like a separate sub domain. And that means, that unless you tell your DNS server what to do with an address formed that way, users who do type “www” won’t get to your site.
To fix that, we’ll need to create an Alias record set. Click “Create Record Set” once again, and this time enter “www” into the Name field. Click the “Yes” radio button next to Alias, and then click once in the Alias Target field that will appear. As you can see from figure 3, a menu has popped up with links to any existing record sets based on resources that might currently exist in your account that could be used as a target. “stuff.org” is the last one on the list (or, perhaps more accurately in this case, the only one available). To select stuff.org, click on it, and then click “Create”.Figure 3. Creating a new alias record set — this time to accommodate www URL prefixes.

Note also how my first A record is now displayed along with the other active record sets in the main panel.
If you need to redirect traffic aimed at one name (like, for instance, vids.stuff.com) to a different name (like videos.stuff.com) then you could create a CNAME (Canonical Name) record. This might be useful if you’ve got a number of domains that are all supposed to lead to a single site.
I should add that all of this is possible despite the fact that the IP address I used (54.32.154.87) doesn’t actually exist, and that, obviously, I have no control over the domain stuff.org (without access to its name servers, I’d have no way to point visitors to my IP address). Route 53 provides me the platform to create as many hosted zones and record sets as my little heart desires, while leaving the practical details — like their validity — in my hands.
Having said that, I would be charged a fee of $0.50 for every month I left my stuff.org hosted zone active, regardless of how much work it was actually doing. To allow experiments and testing, AWS won’t charge for zones that are deleted within twelve hours.
Elastic IP addresses
Which IP address should you use for this hosted zone? Let’s say that you’ve made a WordPress site on EC2 — the public IP that you were assigned when you created it would work, but it would be a terrible idea to use it. That’s because there’s no guarantee that that address will be persistently associated with your EC2 instance. If, say, your instance ever crashes, it will probably receive a new IP when it starts up again (thereby breaking all the existing links to your site). At some point, you might also want the power to transfer an existing IP address from one instance to another, but that’s something you just can’t do with the IP you’ve got now.
Associating an *Amazon Elastic IP* address to your instance can solve all those problems by giving you a single, static address that you can closely control. And it’s dead easy.
From the EC2 Dashboard, click on the “Elastic IPs” link in the left panel and then on the “Allocate New Address” button. Confirm that’s what you want to do and, within a few minutes at most, the new Elastic IP will appear in the Dashboard. Once it’s there, you can associate your new IP with any existing instance (or network interface) within your account. Select your IP, click on the “Actions” button, and then on “Associate Address”, then (figure 4), click once inside the Instance field to see a list of available instances. Once you click on “Associate” that instance will be publicly accessible through the Elastic IP.
Figure 4. The Associate Address popup box you use to apply an Amazon Elastic IP address to your EC2

Last updated