> For the complete documentation index, see [llms.txt](https://tkssharma-devops.gitbook.io/devops-training/llms.txt). Markdown versions of documentation pages are available by appending `.md` to page URLs; this page is available as [Markdown](https://tkssharma-devops.gitbook.io/devops-training/docker/docker-compose/docker-compose-demo.md).

# Docker Compose Demo

### How To Dockerize Node JS application with Mysql&#x20;

I’ll be demonstrating the ease of ‘dockerizing’ an application with a full stack JavaScript application. This is a MERN application, except replace the MongoDB with a MySQL database.

Here’s a high level look at the file structure of this particular application. Since I’m demonstrating with a relatively small user registration app, I’m keeping the server and client in the same repo, but it would be very easy to break them up into multiple separate projects and knit them together with the help of `docker-compose.yml`s.

Side note: If these were to be two (or more) separate services, I would need to keep a `docker-compose.yml` in both repos so each could be spun up for local development. The service being developed would build a new image each time `docker-compose up` is invoked, and it would have access to the necessary other service’s Docker image stored in Docker Hub (or wherever you choose to store images) with the tag of the version I wanted in the `docker-compose.yml`. For production, there’d also be a third `docker-compose-prod.yml` which would only use images that were tested and approved. But that’s outside the scope of this article.

Back to the project file structure.

### App File Structure

```
root/
├── api/ 
├── client/ 
├── docker/ 
├── docker-compose.yml 
├── Dockerfile
```

Obviously, there’s plenty of files contained within each one of these directories, but for simplicity’s sake I’m just showing the main file structure.

Even though both the `client` and `api` folder are contained within the same repo, I built them with micro services and modularity in mind. If one piece becomes a bottleneck and needs a second instance, or the app grows too large and needs to be split apart, it’s possible to do so without too much refactoring. To achieve this modularity, both my API and client applications have their own `package.json` files with the dependencies each app needs to run. The nice thing is, since this is currently one application and both apps are JavaScript, I can have one `Dockerfile` that works for both.

### The Dockerfile

Here’s what the `Dockerfile` looks like:

```
// download a base version of node from Docker Hub
FROM node:9// create the working directory for the application called /app that will be the root
WORKDIR /app// npm install the dependencies and run the start script from each package.json
CMD ls -ltr && npm install && npm start
```

That’s all there is to it for this Dockerfile: just those three commands. The `docker-compose.yml` has a little bit more to it, but it’s still easy to follow, when it’s broken down.

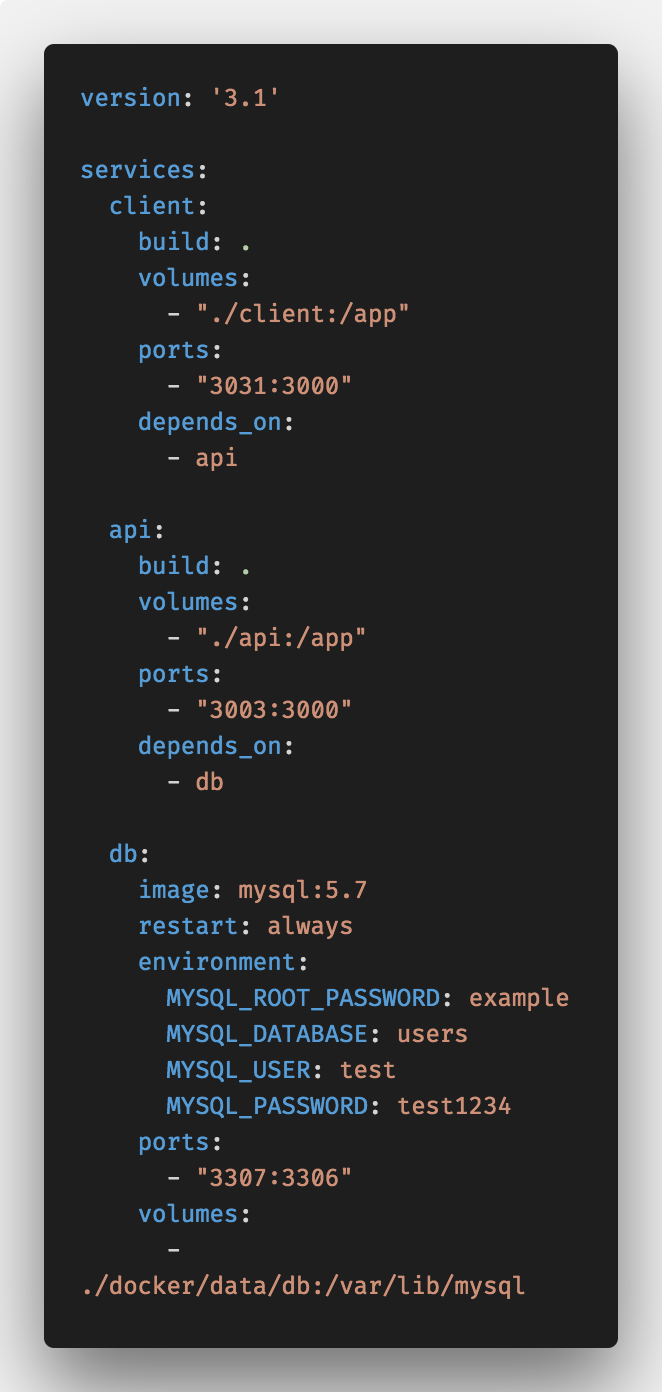
### The Docker-Compose.yml

```
version: '3.1'

services:
  client:
    build: .
    volumes:
      - "./client:/app"
    ports:
      - "3031:3000"
    depends_on:
      - api

  api:
    build: .
    volumes:
      - "./api:/app"
    ports:
      - "3003:3000"
    depends_on:
      - db

  db:
    image: mysql:5.7
    restart: always
    environment:
      MYSQL_ROOT_PASSWORD: example
      MYSQL_DATABASE: users
      MYSQL_USER: test
      MYSQL_PASSWORD: test1234
    ports:
      - "3307:3306"
    volumes:
      - ./docker/data/db:/var/lib/mysql
```

I would like to note there’s a newer version of MySQL available on Docker Hub, but I couldn’t get it to work properly with Docker Compose, so I would recommend going with the mysql:5.7 version until further notice.

<div align="center"><img src="https://miro.medium.com/max/1324/1*SIjHXh82geYRHbi4AwgsKQ.png" alt=""></div>

In the picture above, you can see my two services: the `api` and `client` , as well as the database (the first mention I’ve made of it thus far, and one of my favorite things about Docker Compose).

To explain what’s happening, both the client and API services are using the same `Dockerfile`, which is located at the root of the project (earning them both the `build: .` build path. Likewise, each folder is mounted inside of the working directory we specified in the `Dockerfile` with the `volumes: ./<client or api directory>:/app`. I exposed a port for each service to make debugging of individual services easier, but it’d be perfectly fine to only expose a port to the application through the UI. And finally, the `depends_on`makes each piece of the app wait until all the parts have started up.

The `client` depends on the `api` starting, the`api` depends on the `database`starting, and once all the credentials are supplied to the database and the image is pulled from [Docker Hub](https://hub.docker.com/_/mysql/), it can start up. I opened a port on the database so I could connect [Sequel Pro](https://www.sequelpro.com/) to my database and see the user objects as they’re made and updated, as well. Once again, this makes debugging as I develop the application easier.

The very last line of the database about `volumes`, is a special line that deserves attention. This is how data is persisted for the application. It’s only persisted locally to the machine the Docker ecosystem is running on, but that’s usually all you need for development. This way, if you’re using [Flyway](https://flywaydb.org/)or [Liquibase](https://www.liquibase.org/) or another SQL runner to create the tables and load data into them and you then change that data, to test the app’s functionality, the changes can be saved so that when you restart the app, the data is the way you left it. It’s really awesome.

Ok, so the `Dockerfile` has been covered, the `docker-compose.yml` has been explained, and the database image being pulled from Docker Hub has been noted. We’re about ready to roll.

### Start the App With One Line

Now it’s time to start this application up. If it’s your first time developing this application locally, type `docker-compose build` in the command line. This will build your two images for the client and API applications — the MySQL database comes as an image straight from Docker Hub, so there’s no need to build that image locally. Here’s what you’ll see in the terminal.You can see the db is skipped and the API and the client are both built using the Dockerfile at the project’s root.

![](https://miro.medium.com/max/1400/1*xAd86RxeyHw6XGzeDT2VAg.png)

Once the images are done building, type `docker-compose up`. You should see a message in the terminal of all the services starting up and then lots of code logging as each piece fires itself up and connects. And you should be good to go. That’s it. Up and running. You’re done. Commence development.This is what you’ll see right after writing \`docker-compose up\`. Once all the services register done, they’ll try to start and connect and you should be good to start developing.

![](https://miro.medium.com/max/1400/1*PIsL_VQh1KKB6OcYWd5MhQ.png)

Whenever you want to stop your app, you can just type `docker-compose down`into the terminal, and the services will gracefully shut down. And the data will be persisted locally, so when you type `docker-compose up` to start the applications back up, your data will still be there.What you see when you stop the services with \`docker-compose down\`.

![](https://miro.medium.com/max/1400/1*GBaO_Hd3PsKkts30QBni5Q.png)

### Conclusion

Docker and Docker Compose can make web development a heck of a lot easier for you. You can create fully functional, isolated development environments complete with their own databases and data with very little effort on your part, speeding up development time and reducing or avoiding the problems that typically arise as projects are configured and built by teams. If you haven’t considered ‘dockerizing’ your development process&#x20;

{% embed url="<https://github.com/kumartarun/node-mysql-docker>" %}


---

# Agent Instructions
This documentation is published with GitBook. GitBook is the documentation platform designed so that both humans and AI agents can read, navigate, and reason over technical content effectively. Learn more at gitbook.com.

## Querying This Documentation
If you need additional information that is not directly available in this page, you can query the documentation dynamically by asking a question.

Perform an HTTP GET request on the current page URL with the `ask` query parameter, and the optional `goal` query parameter:

```
GET https://tkssharma-devops.gitbook.io/devops-training/docker/docker-compose/docker-compose-demo.md?ask=<question>&goal=<endgoal>
```

`ask` is the immediate question: it should be specific, self-contained, and written in natural language.
`goal` is optional and describes the broader end goal you are ultimately trying to accomplish on behalf of the user. GitBook uses it to tailor the answer towards what is most useful for that goal.

The response will contain a direct answer to the question and relevant excerpts and sources from the documentation.

Use this mechanism when the answer is not explicitly present in the current page, you need clarification or additional context, or you want to retrieve related documentation sections.
