AWS Code Build
AWS CodeBuild is a fully managed continuous integration service that compiles source code, runs tests, and produces software packages that are ready to deploy. With CodeBuild, you don’t need to provision, manage, and scale your own build servers. CodeBuild scales continuously and processes multiple builds concurrently, so your builds are not left waiting in a queue. You can get started quickly by using prepackaged build environments, or you can create custom build environments that use your own build tools. With CodeBuild, you are charged by the minute for the compute resources you use.
Running Simple Code Build only to push code to S3
Select Repo and create code Build project and connect to github using personal token or using o-auth

Add builspec file from repository or Just add Build commands like npm install and npm run build

Add Build artifacts Location post Build as S3 Bucket

Trigger Build by passing Commit ID in source version


Lets Build end to end Pipeline using Code Pipeline
Build this pipeline to S3 Code Push
Automated Pipeline Flow Diagram

As if the cost benefit wasn’t enough, S3 provides high availability, infinite scalability and can literally be setup in a matter of minutes. This makes it the ideal go to solution when it comes to hosting Single Page Applications (SPAs) like VueJS or ReactJS sites.
As easy as it is, it can get quite mundane updating your sites and managing environments using the console. As a developer I’m more comfortable handling such things from the comfort of my terminal and code editor.
That’s why I decided to find a solution which automates building and deploying of static sites while handling multiple environments with grace
I’m going to show you how to setup a code pipeline which pulls data form from your github repo and bundles the code via tha “npm build” command using the appropriate environmental variables and uploads the site to AWS S3. So let’s get started …
Code (React)
Let’s start with the code itself. I already have a simple react app setup and pushed to github. You can find the repo here.
We’ll be using the dotenv npm package. You can install it with this command
Then you’ll want to create .env files for each environment you want. I usually setup three of .env files namely;
.env.development
.env.staging
.env.production.
An important thing to remember is that every variable in the .env files must start with REACT_APP, something like this;
If you’re using Vue, with vue-cli 3. Then you don’t need the dotenv package. Just create the .env files and name your variable appropriately, e.g. VUE_APP_ENVIRONMENT
In the package.json file, change the start and build scripts to accommodate the new .env files.
Now instead of the usual “npm start” you’ll need “npm start:dev” and react will use the .env variables for development while running locally. 👍
The last thing we need to do is add a file named “buildspec.yml”. This file is used by AWS CodeBuild to install npm, run it and bundle the code for appropriate environments. We’ll come back to it later.
Branch - code-build-code-pipeline-setup
Create S3 Bucket
So far so good let’s create the S3 bucket that’ll house our website for everyone to marvel at 😉.
Since you’ll want your website attached to a domain name, you’ll want to name your bucket the same as you domain.
Click on “Create Bucket”, name it the same as your domain and give it public read access. Once its created you’ll need to configure the bucket for website hosting.1) Click Create Bucket → 2) Name bucket same as domain

Website Hosting
To host a static website, you configure an Amazon S3 bucket for website hosting, and then upload your website content to the bucket. This bucket must have public read access. Go to “Properties ” tab and click the “Static Website Hosting” card.1) Go to Properties Tab → 2) Click Static Website Hosting


The panel shown above will open. Just fill it out as it is in the picture and your bucket is ready to host a static website. But we’re not done yet 😦 !
Policy Generator
The last thing we need to do is create a “Bucket Policy”, so that other AWS apps (CodeBuild) can access and perform actions on your bucket. Follow the Diagrams below to complete the S3 setup.1) Go to Permissions Tab → 2) Click on Policy Generator → 3) Copy bucket arn

The above image shows where you enter the bucket policy. Copy the arn, labeled 3, then click on “policy generator”.1)
Select Policy type → 2) Fill Add Statement Options

Here is where you create the bucket policy. Enter the following value in the Add Statement section;
policy type → S3
Effect → Allow
Principal → *
Actions → All Actions (*)
Amazon Resource Number (ARN) → Copy “arn” from permissions tab
Click “Add Statement”
Click Generate Policy

Clicking on “Generate Policy” will spit out the policy. You’ll need to edit the “Resource” section before copying it in the Permissions Tab.
AWS CodePipeline (with Code Build)
Okay !! So we’re almost there. CodePipeline has different phases in which it can pull data, build, test and deploy code to the desired location. Our pipeline will be pretty simple with only two phases.
Source: Get latest commit from Github.
Build: Build the project and upload it to S3.
In the AWS Console, search for CodePipeline and click on the orange button labeled “Create Pipeline”.
Follow the steps below
1) Create a new pipeline

Enter Pipeline Name
Service Role → AWS will create a new service role or you can choose an existing one.
Artifact Store → Select custom location and choose the S3 bucket you created earlier.
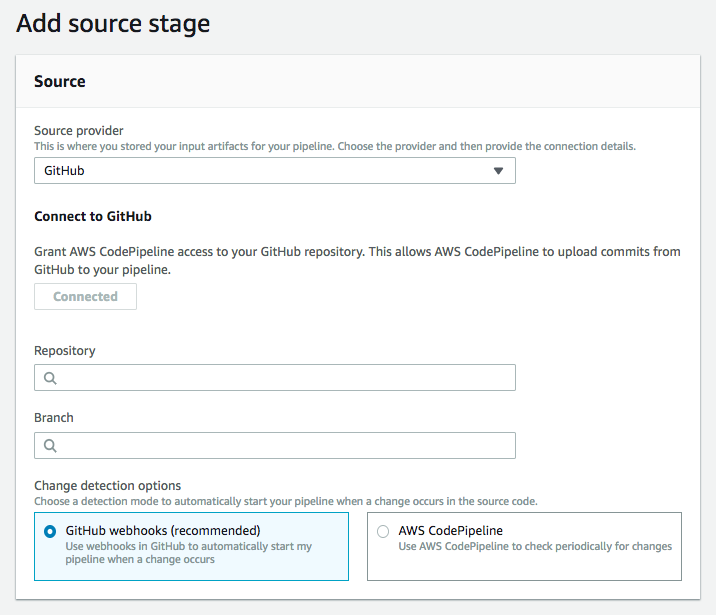
2) Add Source

Source Provider → Select Github and login with your account.
Repository & Branch → Select appropriate repo and branch.
3) Create & Add Build Stage

Build Provider → Select AWS CodeBuild
Click on Create Project
AWS CodeBuild
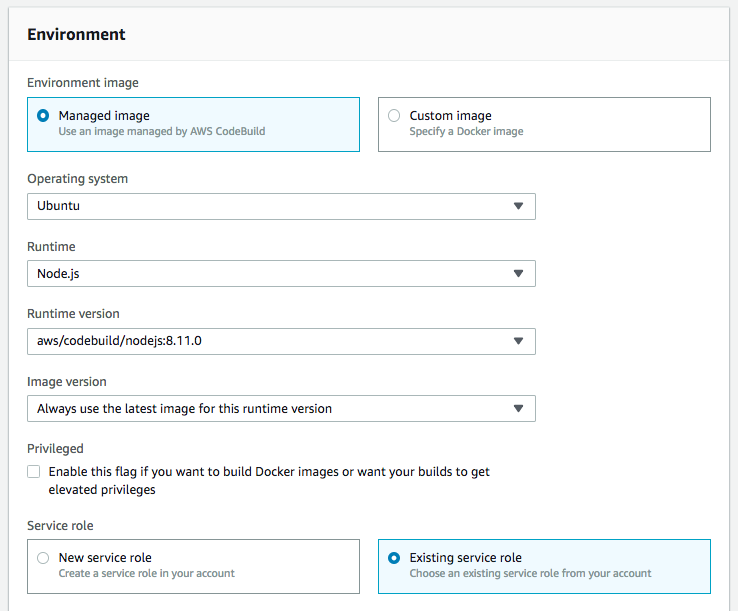
4(a) Project Configuration4(b) Build Environment Configuration


Environment Image → Managed Image
Operating System → Ubuntu
Runtine → Node.js
Runtime Version → Node.js:<latest-version>
Service Role → AWS will create a new service role or you can choose an existing one.
4(c) Add Environment Variables

Click on “Additional Configuration” to open the drop. At the bottom, add two env variables. We’ll use these variables in the buildspec.yml mentioned below.
ENVIRONMENT → dev | stage | prod
S3_BUCKET → s3://bucket-name
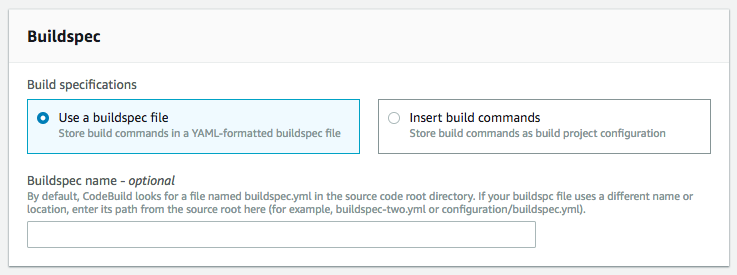
4(d) Buildspec

Select “Use a buildspec file”, this will make CodeBuild use the buildspec.yml file I mentioned earlier. Remember CodeBuild uses this file to specify which commands it should follow during, after and before the build process.
We use four phases in the buildspec.yml file. Each phase has a number of commands. All command and phases are executed in the order they are written in.
install → install npm, pip and awscli
pre-build → run “npm install”
build → build the react/vue project with “npm run build:$ENVIRONMENT”.
post-build → upload the “build/” folder to s3 bucket defined in the environmental variable $S3_BUCKET
Note: This way you can use the same “buildspec.yml” file with different CodeBuild projects, all with the same configurations but with different env variables depending on your environments.
This completes the CodeBuild setup, click on “Continue to CodePipeline” and you’ll be redirected to the AWS CodePipeline form.
5) Deploy

We don’t need the deploy stage because the buildspec.yml file builds and uploads the code to S3 bucket itself. So we‘ll “Skip deploy stage” and create the pipeline.
6) End Result

The finished pipeline will look something like this. It has only two phases, the “Source” phase which is responsible for pulling data from GitHub. And the “Build” phase which is responsible for building and deploying the code to S3.
For managing multiple environments just create another CodeBuild project with the appropriate environmental variables and add it to the existing CodePipeline.
Last updated