Assignment 01-Node JS app on EC2

Node.js is a JavaScript runtime environment that allows one to run JS on the server. It is built on the open-source V8 JavaScript engine used in Chrome and written in C++ which executes JS in a standalone environment.
AWS (Amazon Web Services), a subsidiary of Amazon, is a cloud computing platform which provides resources for computation such as EC2 instances, various database and storage facilities as well as networking and content delivery options.
Nginx is a free and open-source HTTP server which doubles up as a reverse proxy server or as a mail proxy server. It is a high performance server with simple configuration options and low resource consumption.
EC2 (Elastic Compute Cloud) is a web service which provides computing power in the form of scalable server instances. Multiple EC2 instances are run on the same machine inside Amazon’s computing infrastructure. When an EC2 instance is initiated, a set amount of resources (OS, RAM, Disk Space etc., chosen at the time of initiation) are allotted to the user from the machine it runs on. This allows sharing of resources between multiple users.
Linux AMI is a copy of Linux (image) provided by AWS which can be used for free on an EC2 instance as an OS. It can contain pre-installed packages such as Python, MySQL, Node.js etc., depending on the chosen AMI.
Things to do
Create an AWS account
Launch an EC2 instance
SSH into your instance
Install Node.js
Install Git and clone repository from GitHub
Start the node.js app
Keep the app running
Move the app to port 80 (not really)
Configure Nginx to autostart on instance reboot
Create an AWS account
Go to AWS, click on Create an AWS account. If you are already registered, sign in, else create a new account. A new account lets you try the free tier for 12 months. Choose Personal Account unless you have a business setup for which you will need the company details. Create a personal AWS account

You will have to enter your card details for a small refundable charge to verify your identity. Once the registration is confirmed, you can go to the console. AWS Service Dashboard (after registration)

Launch an EC2 instance
Now that the account is setup, you are ready to launch an EC2 instance. Select EC2 from the Services dropdown (top-left), click on Launch Instance and select Free Tier Only.Amazon Linux AMI on an EC2 instance (Free tier)

Select Amazon Linux AMI (which is usually the first option). On the next screen, select t2.micro (will be highlighted as Free tier eligible).Free tier t2 micro EC2 instance — 1 GB RAM and up to 30 GB free storage space

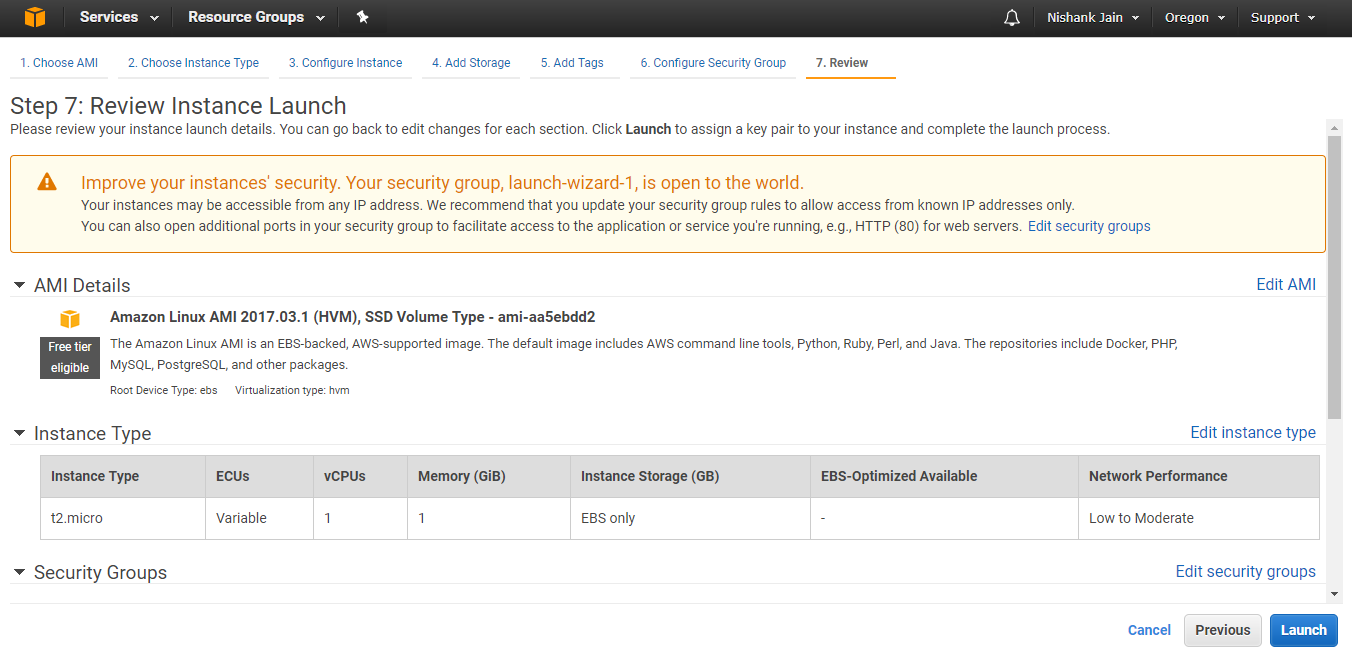
Select Review and Launch (other settings can be configured later if needed). The next screen might show a warning about the security of the instance and changing security group settings. You can ignore this for now. The only open port is 22 by default which is used for SSH access to the instance. Go ahead and click Launch.Warning about security group settings — can be ignored and launched

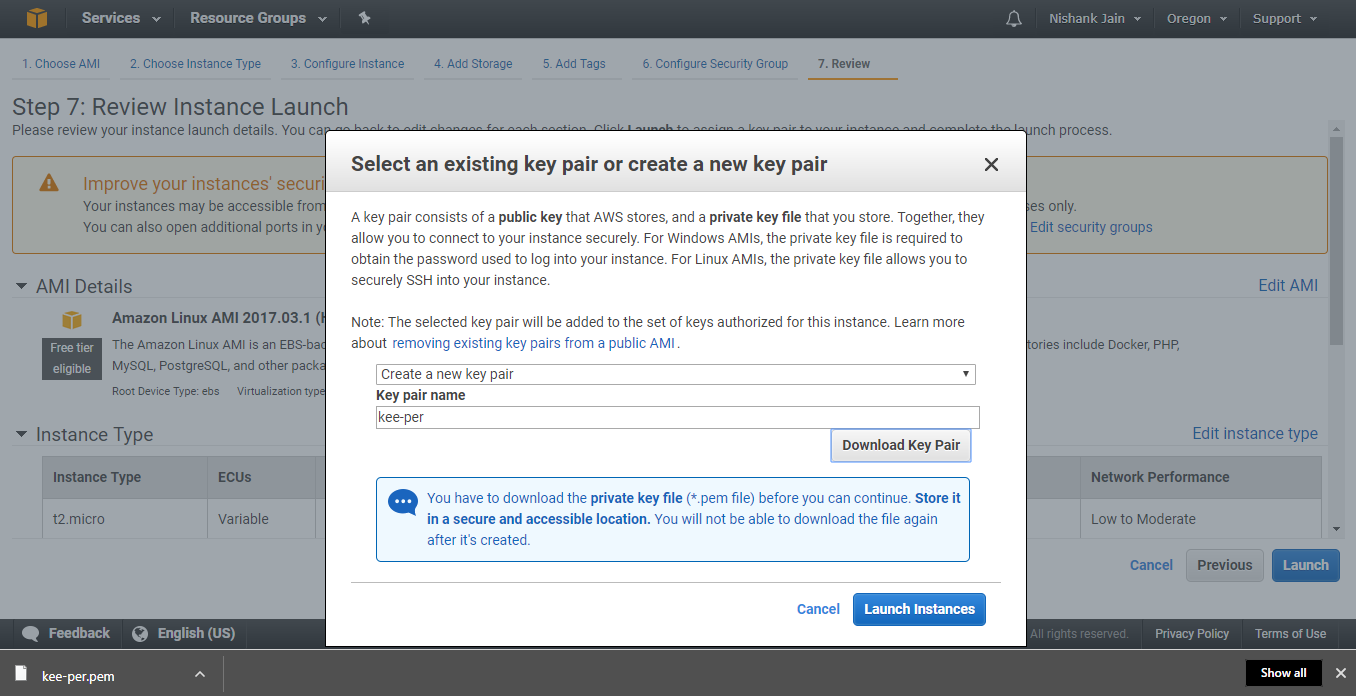
On the next screen, you will be asked to create a key pair which allows you to SSH into your instance. Follow the instructions to create a custom name key pair and store it somewhere on your PC where you can access it later and in the future too.Create a key pair for SSH access

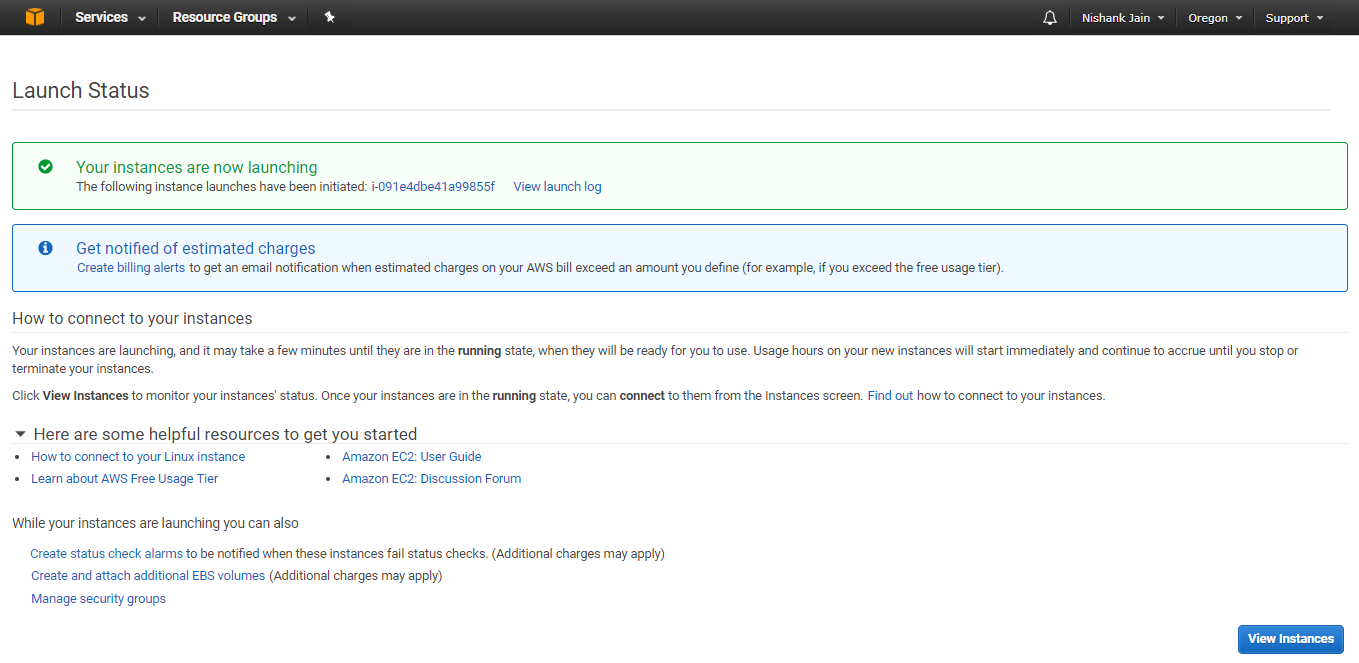
Select Launch Instances and wait for your instance to be launched. On the final screen, you can select View Instances to go to your EC2 dashboard where you will see the instance up and running in a few minutes.Instance Launched

Your EC2 instance will be running now and you will be automatically assigned a Public DNS and an IPv4 Public IP which you will use to SSH into the instance.Instance running on a Public IP

SSH into your instance
Depending on the OS you are using on your PC, there are different methods to SSH into your instance. You can see the applicable method by clicking on Connect in the above screen. Since I use Windows OS, I use a third party SSH client called PuTTY to connect to the instance. You can follow the official tutorial on AWS docs for using PuTTY as the SSH client.Connect to your instance

The key pair that you saved while creating the EC2 instance will be used now to connect via SSH. Once you have established the connection you will see a terminal similar to this.SSH connection established with the EC2 instance
PuTTY frequent disconnection / timeout
If you use PuTTY, you will see that the terminal frequently becomes non-responsive because of a session timeout. You can change the session settings to keep the connection alive by going to the category Connection of the loaded session and change the value of Seconds between keepalives to 30. This will enable sending empty packets to the remote server via SSH every 30 seconds to keep the session alive.
Install Node.js
Now that we are connected to the instance, we can start installing the required packages in the environment for your node.js app to work. We will be using NVM (Node Version Manager) to install node.js as it provides a neat way to manage multiple node.js versions on the instance if required. Run the following code in the terminal to get NVM and install it.
The script clones the nvm repository to ~/.nvm and adds the source line to your profile (~/.bash_profile, ~/.zshrc, ~/.profile, or ~/.bashrc). Now, run nvm --version. The terminal will show command not found as the code has been added to your profile but hasn’t run yet. It runs on every login, so login again by creating a new session. Run nvm --version again and this time you should be able to see the installed version of NVM.NVM installation

To install node, you can either use nvm install node to install the latest version of node or use nvm install <node_version> to install a specific version of node. Once node is installed, you can check the installed version with node --version.Node.js installation
Install Git and clone repository from GitHub
We will install Git to clone your node.js repository from your GitHub account. To install Git, run the following command.
This will install the latest version of Git on the instance. Once installation is done, you are ready to clone your repository. Run the following command to clone your repository. Replace <username>with your GitHub username, <repository-name>with the name of your node.js app repository and <folder-name>with the name of the folder you want to clone the repository into. This folder will be created under /home/ec2-user/.
Run cd <folder-name> to move inside this folder and ls to see its contents.
Start the node.js app
If your start script does not include npm install you should run it manually first, otherwise you can directly issue the command to start the app which should install the dependencies automatically. There are several ways to start the app depending on how you have set it up. Choose one which suits you.
The app will now run at the port number that you have specified in the start script. It could be 3000, 8000, 8080 etc. Make a note of this port number and enter the public DNS of the instance with the port number in the browser to see the app output. I use port 3000, you can replace it with yours.
As you will see, this will not work and there would be nothing to show on the page and the browser connection will timeout. This is because we haven’t opened port 3000 for access to public. This is where the Security Group comes in. In the AWS management console, go to Security Groups, select the one not named ‘default’ (launch-wizard-1 or similar) and edit the Inbound rules.Security Groups for the EC2 instance

Add a new custom TCP rule with port range 3000 and accessible from everywhere (0.0.0.0/0).Inbound rules for the EC2 instance

Access the URL again and you should be able to see the app content now.
Keep the app running
The app will run as long as you have the terminal open and you have not stopped it manually. But as soon as you close the terminal or press Ctrl-C or its equivalent, the app will stop as its process is not running in the background, it’s tied to the active terminal. You can write a script to run the process in the background but you will also have to take care of restarting the process in the background in case it crashes or if you perform a pull from the repository or if you update the app in some other way. But there’s an easier way to do all this by using a process manager for node called PM2. We will focus on the auto-restart and background process functionalities of PM2 here. More functionalities in a later article on continuous integration.
Kill all the running node processes (if any) — killall -9 node. Install PM2 globally with the following command:
Move to the cloned folder and execute one of the following commands depending on how you had started the app before:
Now even if you close the terminal and check the url in the browser, the app will be running. Sweet! For automatically running PM2 when the server restarts, issue the following command:
This will output a script in the terminal which you need to run, copy the script that it outputs and run it in the terminal window. Now, save all the currently running processes so that they can be run again whenever PM2 restarts either manually or by a script with the following command:
Now you can try rebooting the instance and visit the url and see if the app works or not. To see a list of the currently active node processes with their process names, run pm2 list and to monitor any one of the processes run pm2 monit.
Move the app to port 80 (not really)
The URL for our app contains the port number 3000 which if you have surfed the web a lot will appear a bit out of the place because you don’t usually see such numbers in the URLs, reason being the websites are generally served on the standard port 80 used for HTTP requests and browsers assume it by default.
Currently our node server is running on a publicly open port which is not a particularly brilliant idea as we are directly exposing the application server to internet traffic and also reducing performance by not taking advantages of load balancing or serving static content efficiently.
A better way to manage this is to use Nginx as a reverse proxy server in front of all other application servers. It will act as an efficient web server routing multiple requests on port 80 to different application servers based on the requested domain or even route high volume internet traffic to the same domain on port 80 to multiple instances of the application server listening on different private ports to perform load balancing in case of application server overloading or crashing. Nginx also takes care of SSL encryption instead of letting Node do all the work.

Let’s install Nginx first:
and verify the installed version with nginx -v.
Open port 80 by adding another inbound rule to the security group.Open port 80 for public access

Enter the public DNS or the public IP of your EC2 instance in the browser now without a port and you should see the default Nginx welcome page.
The default Nginx welcome page

Now, we are not really going to move the app to listen on port 80, the app will still be running on port 3000. We will install Nginx in front of the application server, run it on port 80 so that it can intercept all internet traffic and route it to port 3000 where the required application server will be listening if the HTTP headers match (more details in the next article on serving the site on HTTPS). A nice explanation of why we should be doing this is available here.
To use port 80 to route requests to the application server on port 3000, we will edit the nginx configuration file — nginx.conf as follows.
Open the nginx.conf file with an editor in the terminal:
If there’s no server block listening on port 80, add one or change it if it already exists to look like this:
Since we have a single server block listening on port 80, all traffic will be routed from here itself regardless of the value of the server_name directive. The location directive has been changed to point to the resource from where the content has to be served, in our case it is the node.js application server running on the private localhost IP 127.0.0.1 and port 3000. Ignore the other directives for now.
Save the configuration and restart the server with the following command:
You will now have all HTTP traffic available on port 80 forwarded to port 3000. You should close port 3000 to public access by removing it from the security group settings. Visit the URL again in the browser without the port and you will be able to see the app content now instead of the default Nginx welcome page.
Configure Nginx to autostart on instance reboot
There’s just one last thing to take care of before we wrap up. We need to configure Nginx to start automatically if the instance is rebooted. Execute the following command to do this:
You can close the session, reboot the instance and visit the URL again. You should see the app being served on port 80.
And now we are done :)
Since, we have the app being served on port 80 now, we will take care of the following stuff in the next article:
Buy and register a domain name
Serve the website on the registered domain
Obtain an SSL certificate for the registered domain
Install the SSL certificate on the server
Run SSL test for the website
Update security parameters on the website
Automatically renew the certificate
If you are stuck at any point in the sections above or if I have made a mistake somewhere or missed an essential point, do let me know in the comments.
Last updated